TOKEN BASED AUTHENTICATION FOR MEAN STACK APPS – PART 2
Let’s populate our user model. This is a mongoose schema that represents a collection in our Mongo Database.
user.server.model.js
|
1 2 3 4 5 6 7 8 9 10 11 12 13 14 15 16 17 18 19 20 21 22 23 24 25 26 27 28 29 30 31 32 33 |
var mongoose = require('mongoose'), bcrypt = require('bcrypt'), userSchema = mongoose.Schema({ fullname: { type: String, required: true }, email: { type: String, required: true, unique: true }, password: { type: String, required: true }, address: { type: String, required: true, default: ''}, registered_on: { type: Date, default: Date.now } }); userSchema.methods.hashPassword = function(userpassword) { return bcrypt.hashSync(userpassword, bcrypt.genSaltSync(10), null); }; userSchema.methods.comparePassword = function(requestPassword, dbpassword, cb) { bcrypt.compare(requestPassword, dbpassword, cb); }; module.exports = mongoose.model('User', userSchema, 'users'); |
Now, that we have a user model, it’s time to write a user controller that will manipulate the models.
user.server.controller.js
|
1 2 3 4 5 6 7 8 9 10 11 12 13 14 15 16 17 18 19 20 21 22 23 24 25 26 27 28 29 30 31 32 33 34 35 36 37 38 39 40 41 42 43 44 45 46 47 48 49 50 51 52 53 54 55 56 57 58 59 60 61 62 63 64 65 66 67 68 69 70 71 72 73 74 75 76 77 78 79 80 81 82 83 84 85 86 87 88 89 90 91 92 93 94 95 96 97 98 99 100 101 102 103 104 105 106 107 108 109 110 |
var User = require('../models/user.server.model'), jwt = require('jsonwebtoken'), _ = require('lodash'), secrets = require('../../config/secrets'); module.exports = { /** * [authenticateUserByEmailAndPassword -- Authenticate User Email and Password] * @param req * @param res * @return Void */ authenticateUserByEmailAndPassword: function(req, res){ var email = req.body.email; // get the user's email from the request body // Generate a signed and unique token var token = jwt.sign(email, secrets.sessionSecret, { expiresInMinutes: 1440 }); // Check if the email exists and return the user details based on that or otherwise User.find({email: email}, function(err, user) { if(err){ return res.status(500).json({ error: err }); } if(user.length === 0){ return res.json({ success: false, message: 'Authentication failed. User not found.' }); } else if(user.length == 1) { var users = new User(); // Compare the user's password with the password present in the user's collection users.comparePassword(req.body.password, user[0].password, function(err, result){ if(err){ return res.status(500).json({ error: err }); } // store the user detail in the userobject var userObject = user[0]; // extract and return the needed user details var currUser = _.pick(userObject, '_id', 'fullname'); // if the passwords match, return the appropriate json response if(result){ return res.json({ success: true, user: currUser, token: token }); } else { return res.json({ success: false, message: 'Authentication failed. Wrong password.' }); } }); }}); }, /** * [getAllUsers -- Get All the Users registered on the platform] * @param req * @param res * @return void */ getAllUsers: function(req, res){ User.find({}, function(err, users) { return res.json(users); }); }, }; |
Let’s review our authenticateUserByEmailAndPassword function:
It accepts the request and response objects
|
1 |
var email = req.body.email; |
We get the user’s email from the request body.
|
1 |
var token = jwt.sign(email, secrets.sessionSecret, { expiresInMinutes: 1440 }); |
This is where our token is generated for the user.
jwt.sign(payload, secretOrPrivateKey, options)
payload – can be a string, object or buffer
secretOrPrivateKey – is a string containing a unique secret or private key
options – various options for token expiry time, audience, issuer and others but we are concerned with only the expiry time here.
So, secrets.sessionSecret refers to ‘meanprosper’ from our .env file. Remember? 
and we want the token to expire in 24hrs.
The next line indicates that the user collection in the database is been searched if the email exists. If it doesn’t, an “Authentication failed. User not found” response is given Otherwise if it does exist, it goes ahead to compare passwords if they match. If it matches, the user details is returned as an array of one object.
|
1 |
var userObject = user[0]; |
We want just the _id and fullname of the user so we employ the help of lodash’s _.pick() to extract and store them in currUser variable.
|
1 |
var currUser = _.pick(userObject, '_id', 'fullname'); |
NOTE: I know you are already itching to see it work, but keep calm and take a cup of juice , let’s quickly set up our routes
routes.js
|
1 2 3 4 5 6 7 8 |
var User = require('./controllers/user.server.controller'), verifyToken = require('../config/tokenMiddleware'); module.exports = function(app) { app.post('/api/login', User.authenticateUserByEmailAndPassword); app.get('/api/users', User.getAllUsers); }; |
Time to test what we’ve doing all along with POSTMAN
Postman helps to efficiently build, test and work with APIs. Let’s make a request to our login route.
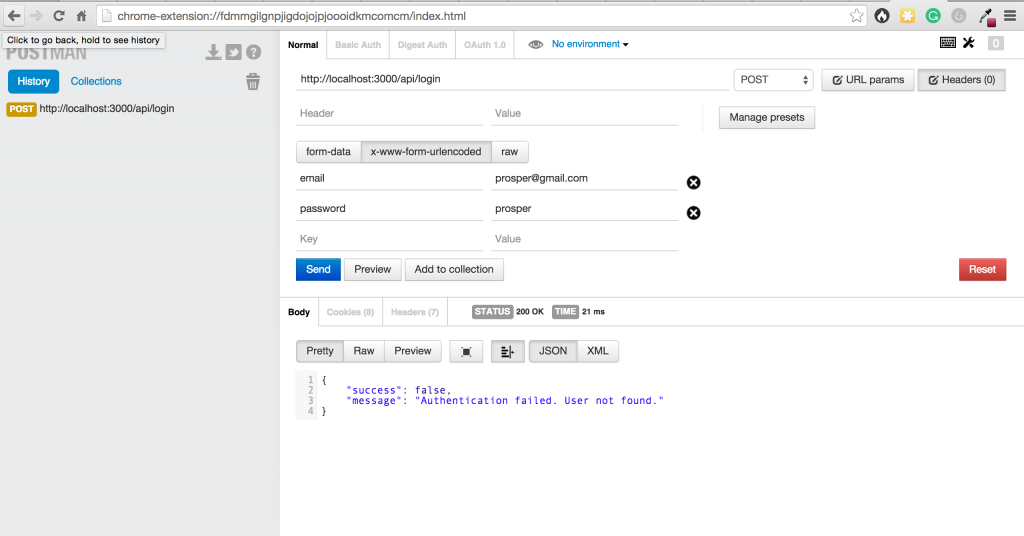
Aha!, the response is expected because we don’t have any user present in our database.
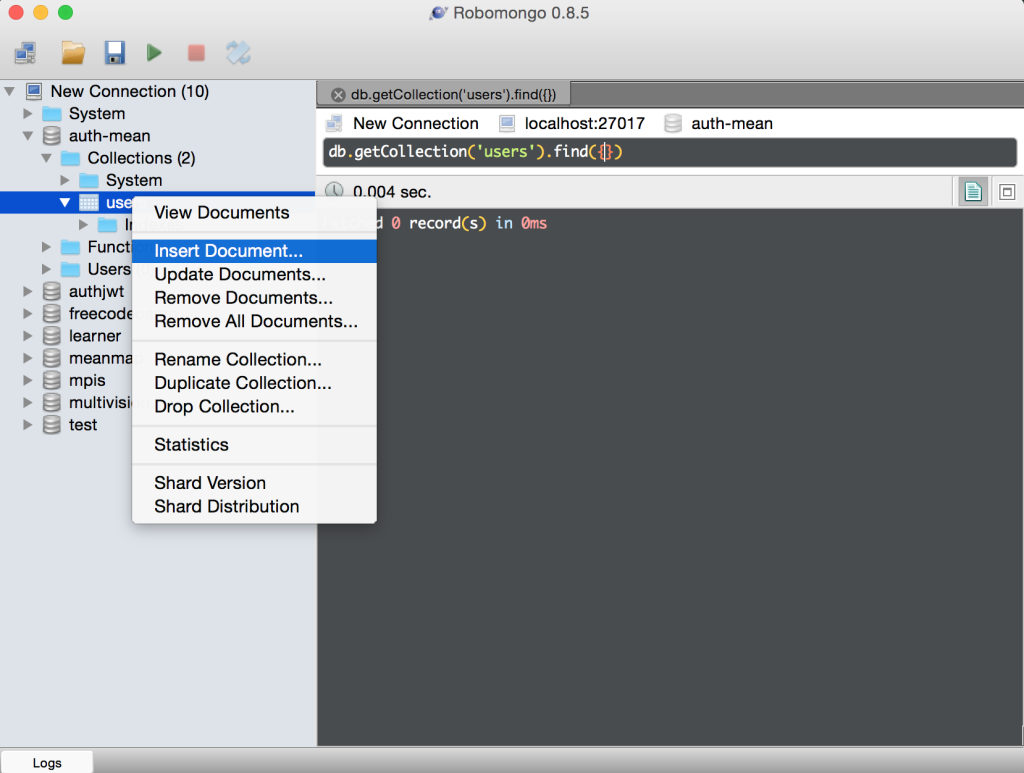
Let’s add some users. I use Robomongo ( Nice GUI for interacting with MongoDB ).
Go into the auth-mean database and into the users collection.
password is actually “busayo” , the one on the image is bcrypt-encrypted
password is actually “goodness” ,the one on the image is bcrypt-encrypted
password is actually “amani” ; the one on the image is bcrypt-encrypted
Now, let’s test with a user in the database.
Yaaaagaaaah!!!!, it authenticated successfully and returned the user’s detail along with a token.
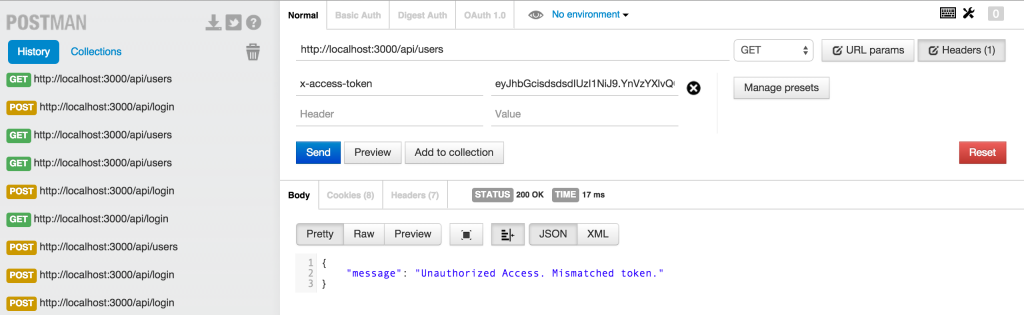
Now, let’s try to access all users route “/api/users”
Anybody can access that route,..we don’t want that, we want only authenticated users to be able to do that.
Let’s go back to routes.js
We had
|
1 2 3 |
// route to get all the Users currently registered app.get('/api/users', User.getAllUsers); |
now let’s add a middleware
|
1 |
app.get('/api/users', verifyToken, User.getAllUsers); |
This checks every request made to /api/users and ensures a valid token is present to access that route.
We already have a file named tokenMiddleware.js in our config folder. You remember?
In there, we have
|
1 2 3 |
// check header parameters for token var token = req.headers['x-access-token']; |
Then it checks the headers if there is any token present,..if there is a token, it verifies whether we have the right token or not.
|
1 2 3 4 5 6 7 8 9 10 11 12 13 14 15 16 17 |
if(token) { // verifies secret and checks exp jwt.verify(token, secrets.sessionSecret, function(err, decoded) { if(err) { return res.json({ message: 'Unauthorized Access. Mismatched token.' }); } else { // if everything is good, save to request for use in other routes req.decoded = decoded; next(); } }); } else { // if there is no token return an error return res.status(403).json({ message: 'Unauthorized Access' }); } |
Now, let’s take the token generated for busayo@gmail.com which is our user account and put them in the headers and try to access the route.
Yaggah!!!, we accessed the route successfully
Now, let’s remove the token in the header and see what happens:
😥
Let’s put back the token and replace some of the characters with some random ones.
Aha!..Gotcha! .Someone is trying to hack our app but it detected and prevented it
That’s all for now, We have a functional backend API. We’re going to cover consuming our API with AngularJs and bringing Life to all that we’ve been doing in Part 3.
- How to build your own Youtube – Part 10 - August 1, 2016
- How to build your own Youtube – Part 9 - July 25, 2016
- How to build your own Youtube – Part 8 - July 23, 2016
- How to build your own Youtube – Part 6 - July 6, 2016
- Introducing Laravel Password v1.0 - July 3, 2016
- How to build your own Youtube – Part 5 - June 28, 2016
- How to build your own Youtube – Part 4 - June 23, 2016
- How to build your own Youtube – Part 3 - June 15, 2016
- How to build your own Youtube – Part 2 - June 8, 2016
- How to build your own Youtube – Part 1 - June 1, 2016