How to build your own Youtube – Part 10
Introduction: If you missed the earlier parts, in this series we are covering how to build your own YouTube clone, Click here.
Note: You need to have at least some prior experience with client-side Javascript frameworks and Node.js to get the most out of this tutorial.
In the previous post, we looked at Adaptive bitrate streaming – HLS and MPEG-DASH, creating mpd and streaming files with various transformations, creating an mpd master playlist file, creating animated GIFs and webP files and delivering animated GIFs and webP files.
In this post, we’ll be looking at how to add number of views and comment functionality to Yourtube.
Add Number of Views
On Youtube, you can see the total number of views that each video has accrued over time. We will implement the same functionality in our Yourtube app right now!
Step 1
Open up your views/pages/home.client.view.html. We will wrap the video divs in an anchor tag like so:
|
1 2 3 4 5 6 7 8 9 10 11 12 |
<!-- 4:3 aspect ratio --> <a href="/my_videos/{{ videos.public_id }}" /> <div class="embed-responsive embed-responsive-4by3"> <video width="320" height="240" poster="" controls > <source ng-src="{{ videos.url | trustUrl }}" type="video/webm"> <source ng-src="{{ videos.url | trustUrl }}" type="video/mp4"> <source ng-src="{{ videos.url | trustUrl }}" type="video/ogg"> Your browser does not support the video tag. </video> </div> <p> {{ videos.description }}</p> </a> |
Step 2
Open up server/models and create a new View model like so:
view.server.model.js
|
1 2 3 4 5 6 7 |
var mongoose = require('mongoose'), viewSchema = mongoose.Schema({ public_id: { type: String, required: true }, counter: { type: Number, required: true, default: 0 }, }); module.exports = mongoose.model('View', viewSchema, 'views'); |
Step 3
Open up server/controllers and create a new View controller like so:
view.server.controller.js
|
1 2 3 4 5 6 7 8 9 10 11 12 13 14 15 16 17 18 19 20 21 22 23 24 25 26 27 28 29 30 31 32 33 34 35 36 37 38 39 40 41 42 43 44 45 46 47 48 49 50 51 52 53 54 55 56 57 58 59 60 61 62 63 |
var View = require('../models/view.server.model'); module.exports = { increment: function(req, res) { var publicId = req.body.public_id; var pagecounter; // Check if the video already has a counter, else create oner View.find({public_id : publicId}, function(err, views) { if(err) { return res.status(500).json({ message: err.message }); } if(views.length <= 0) { var view = new View({ public_id: req.body.public_id }); view.save(function(err, result) { if (err) { res.status(500).json({ message: err.message }); } return res.status(200).json({ success: true, message: "Video Published successfully!" }); }); } else { pageCounter = views[0].counter + 1; var viewDetails = { counter: pageCounter }; View.update({public_id : publicId}, viewDetails, function (err) { if(err) { return res.status(500).json({success: false, message: 'Page Views couldnt be updated', err: err}); } else { return res.status(200).json({ success: true, message: 'Update Successful' }); } }); } }); }, /** * Fetch Each Video view * @param req * @param res * @param next * @return Void */ retrieveEachView: function(req, res){ var publicId = req.params.public_id; View.findOne({ public_id: publicId }, function (err, views) { if(err) { return res.status(500).json({ message: err.message }); } return res.json({success: true, views: views }); }); }, }; |
If the video has never been viewed before, it goes ahead to create a new record for it, then starts to update the view counter on the second HTTP request.
Step 4
Open up server/routes.js and add these routes like so:
|
1 2 |
app.post('/api/view/increment', View.increment); app.get('/api/view/:public_id', View.retrieveEachView); |
First route to grab each view hit and send to the database. Second route to retrieve the number of views for each video.
Step 5
Open up public/js/services and create a new View service like so:
view.client.service.js
|
1 2 3 4 5 6 7 8 9 10 11 12 13 14 15 16 17 18 19 20 21 22 23 24 25 26 |
app.factory('View', ['$http', function($http) { return { increment: function(viewDetails, cb){ $http.post('/api/view/increment', viewDetails).then( function(response){ if(response.data.success){ cb(true, response.data); } else { cb(false, response.data); } }); }, retrieveEachView: function( id, cb ){ $http.get('/api/view/' + id).then( function(response){ if(response.data.success){ cb(true, response.data); } else{ cb(false, response.data); } }); } }; }]); |
Step 6
Open up public/js/controllers/transform.client.controller.js and update the file like so:
|
1 2 3 4 5 6 7 8 9 10 11 12 13 14 15 16 17 18 19 20 21 22 23 24 25 26 27 28 29 30 31 32 33 34 35 36 37 38 39 40 41 42 43 44 45 46 47 48 49 50 51 52 53 54 55 56 57 58 59 |
app.controller('TransformController', ['$scope','$localStorage','$routeParams','Video', 'View', 'toastr', function($scope,$localStorage,$routeParams,Video,View,toastr) { Video.retrieveEachVideoDetails($routeParams.id, function(success, data){ if(success){ $scope.videoDetails = data.video; var viewDetails = { public_id : $routeParams.id }; View.increment(viewDetails, function(success, data) { if(success) { console.log("incremented"); } else { console.log("Something went wrong"); } }); } }); View.retrieveEachView($routeParams.id, function(success, data){ if(success){ $scope.views = data.views; } }); $scope.updateVideo = function() { var videoDetails = { tag: $scope.videoDetails.tag, title: $scope.videoDetails.title, description: $scope.videoDetails.description, audio: $scope.videoDetails.audio, format: $scope.videoDetails.format, width: $scope.videoDetails.width, height: $scope.videoDetails.height, startOffset: $scope.videoDetails.startOffset, duration: $scope.videoDetails.duration, videoBackground: $scope.videoDetails.backgroundColor, url: $scope.videoDetails.url, caption: $scope.videoDetails.caption }; Video.updateVideoDetails($routeParams.id, videoDetails, function(success, data){ if(success) { toastr.success(data.message, { timeOut: 7000 }); $scope.videoDetails.preview = data.audioUrl; $scope.videoDetails.colorPreview = data.colorVideoUrl; $scope.videoDetails.resizedVideo = data.resizeVideoUrl; $scope.videoDetails.trimmedVideo = data.trimVideoUrl; $scope.videoDetails.formattedVideo = data.newFormatVideoUrl; $scope.videoDetails.generatedThumbnail = data.videoThumbnail; $scope.videoDetails.captionedVideo = data.captionedVideoUrl; } else { toastr.error( data.message, 'Error', { timeOut: 2000 }); } }); }; }]); |
What we did was to inject the View service, call the increment method of the View service and also the retrieveEachView method. As the app retrieves the details of each video, it increments the views on that video.
Now, open up index.html and reference the view service like so:
|
1 |
<script src="js/services/view.client.service.js"></script> |
Step 7
Open up public/views/pages/edit_video.client.view.html and add this just before the form like so:
|
1 |
<h5>No of Views: {{ views.counter }}</h5> |
Now when you click on a video from the home page, it should direct you to a page where you can edit the video details. On that page, you will be able to see the number of views for that video like so:
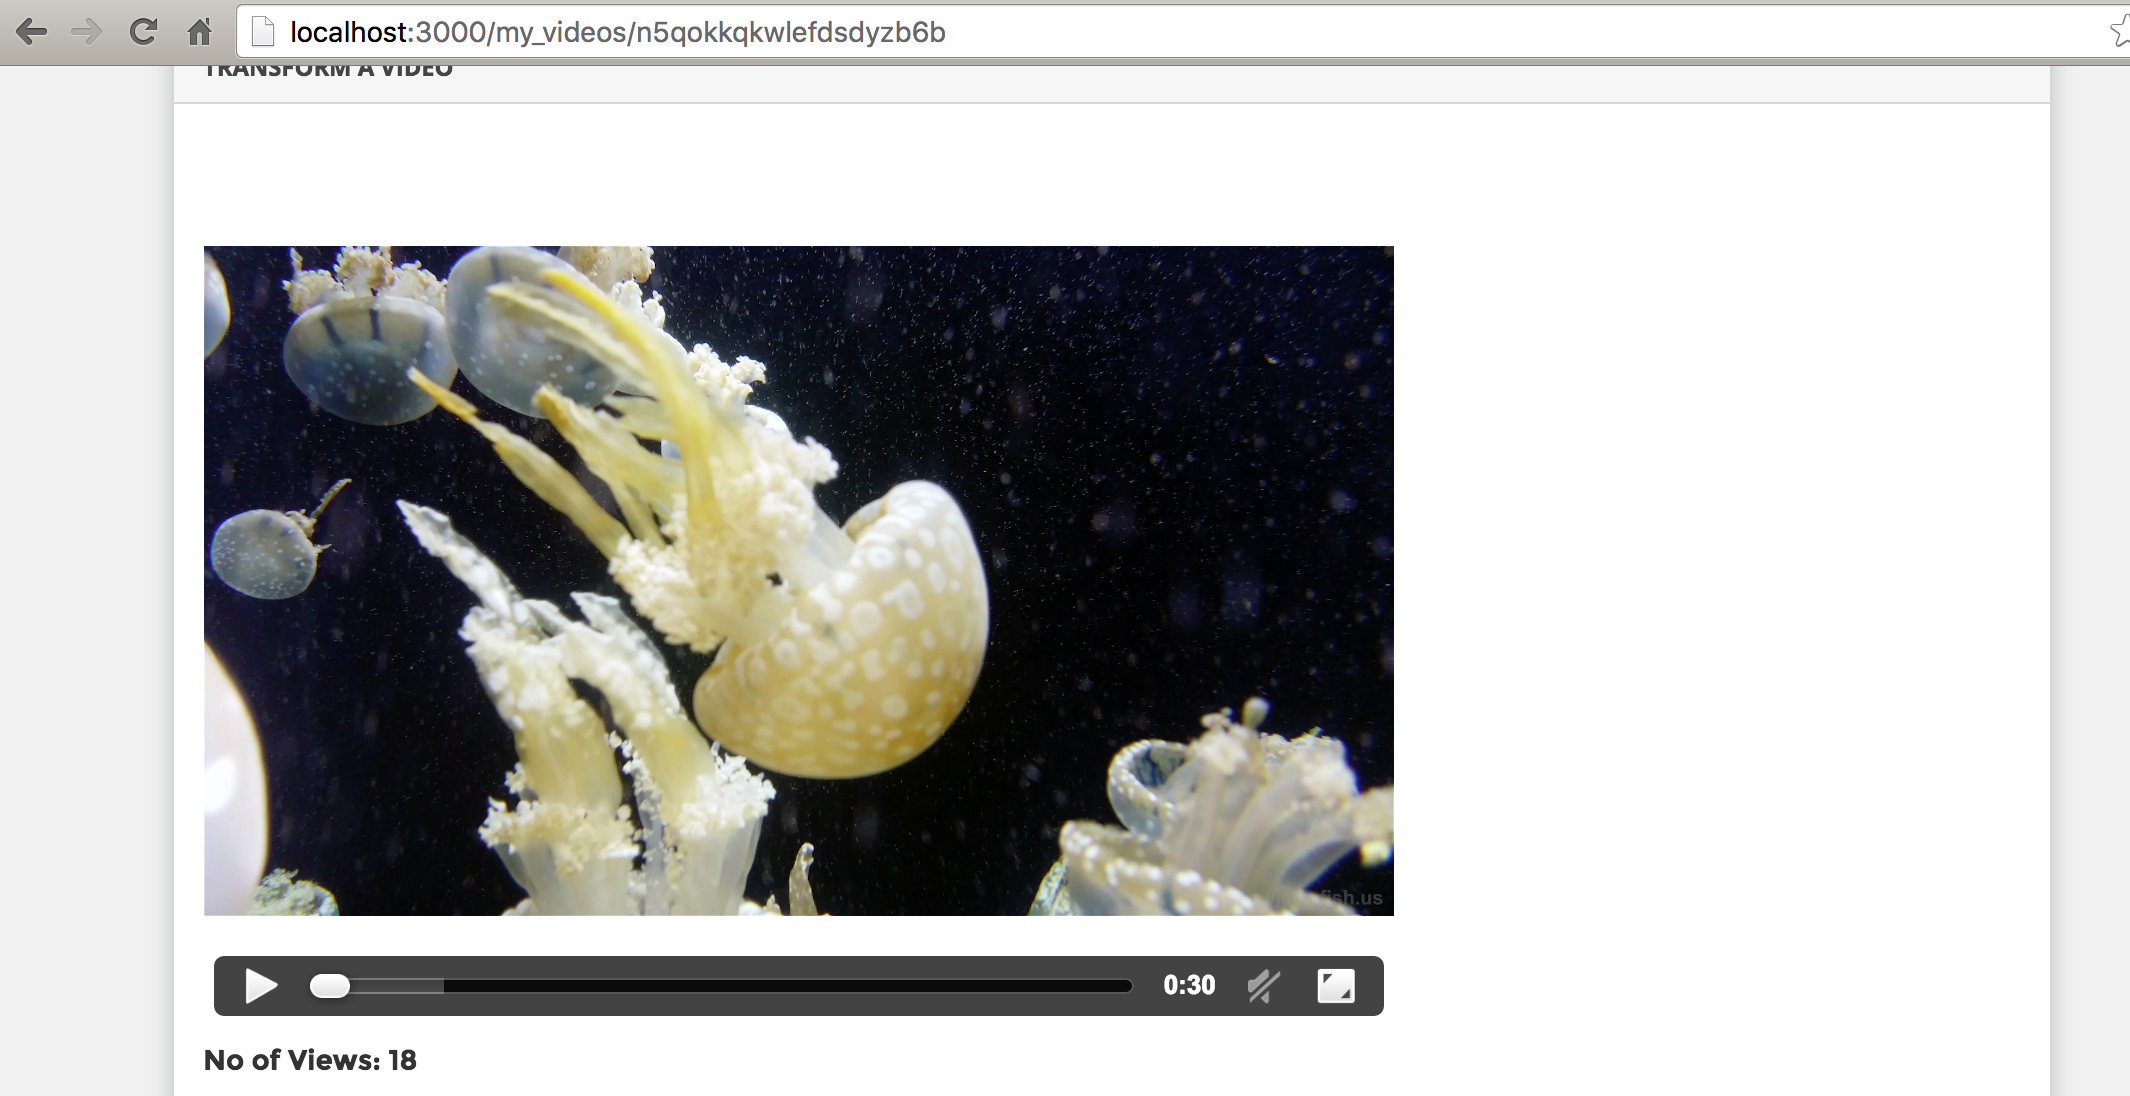
Viola!!!, now users can see the number of views a video has!
Add Comment Functionality
This is probably the simplest functionality we will add to the Yourtube platform. There are two ways of handling this:
- Create comments functionality from scratch and store all the comments on a video in your database.
- Outsource the functionality to a third-party comment system and let the third-party comment service store all the comments and take away that load from our server.
We’ll go with No 2. It’s easier and also scalable that way!
The third-party comment service we’ll use is Disqus. If you haven’t created an admin account on it before, please go ahead and create one now.
Step 1:
There is a very nice angular directive that serves as a wrapper for disqus integration. Let’s install the directive like so:
|
1 |
bower install angular-utils-disqus |
Now, open up public/js/app.js and inject the Disqus module like so:
|
1 2 3 4 5 6 7 8 9 10 11 12 13 14 15 16 17 18 19 20 21 22 23 24 |
var app = angular .module('yourtube', [ 'ngCookies', 'ngRoute', 'ngStorage', 'ngMessages', 'angularMoment', 'angular-loading-bar', 'cloudinary', 'ui.bootstrap', 'appRoutes', 'ngSanitize', 'ngFileUpload', 'toastr', 'ngLodash', 'angular-confirm', 'mwl.confirm', 'angularUtils.directives.dirDisqus', 'satellizer', 'angularUtils.directives.dirDisqus']) .config(['cfpLoadingBarProvider','$authProvider', 'cloudinaryProvider','$httpProvider', function(cfpLoadingBarProvider, $authProvider, cloudinaryProvider, $httpProvider) { .... .... .... |
angularUtils.directives.dirDisqus is the module we just injected.
Step 2:
Open up public/views/pages/edit_video.client.view.html and add this just after the Trimmed Video div like so:
|
1 2 3 4 5 |
<!-- Comments By Users on the videos --> <dir-disqus disqus-shortname="yourtube" disqus-identifier="{{ videoDetails.id }}" disqus-title="{{ videoDetails.title }}" disqus-url="{{ videoDetails.id }}"> </dir-disqus> |
This is the Disqus directive dir-disqus with a unique identifier, title and url so that each video will have different unique comments section else the comment data will overlap.
Now, reload the edit video page and you should see the Disqus comment box show up like so:
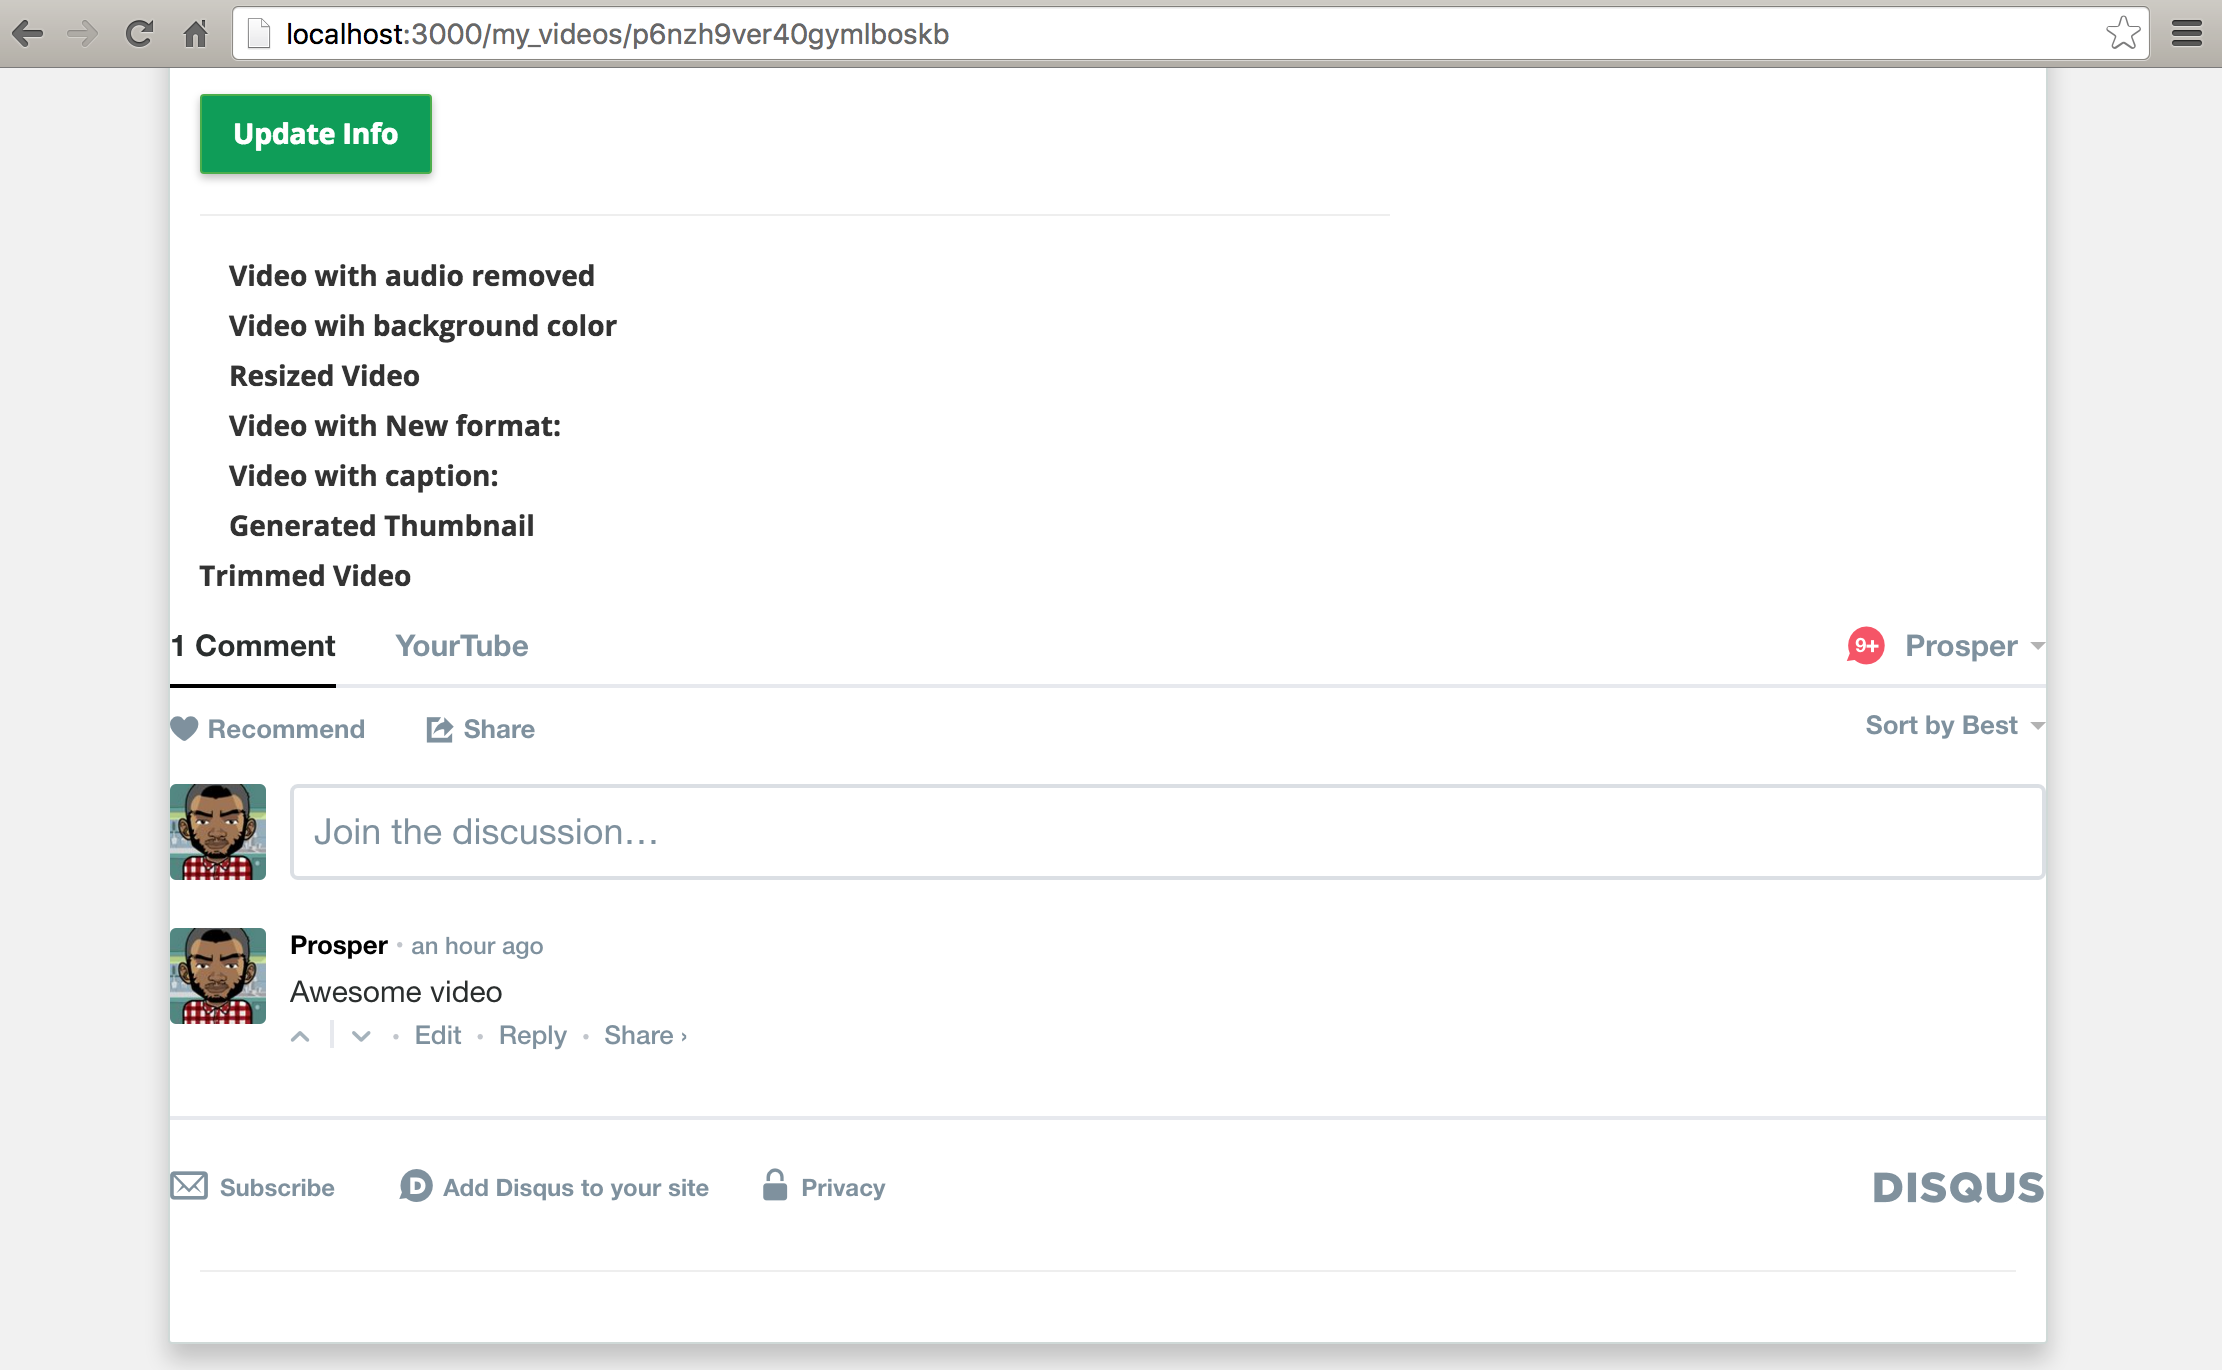
Now, you can easily inspect the disqus element and add styles to the app that will make it look very attractive and also provide nice margins by the sides.
Conclusion
In this post, we have looked at adding the number of views and the ability for users to comment on Yourtube.
It’s really been an exciting journey creating a mini-clone of Youtube. I hope you have been able to learn a lot of new concepts. Once again, Cloudinary is a great service for video uploads and manipulation. They also provide an awesome image storage and manipulation service. You can check out their documentation for more info.
The source code for this project is on GitHub.
You can also check out the Project Management app series I covered using Laravel 5.
If you have any questions or observations, please drop your thoughts in the comment section below 
- How to build your own Youtube – Part 10 - August 1, 2016
- How to build your own Youtube – Part 9 - July 25, 2016
- How to build your own Youtube – Part 8 - July 23, 2016
- How to build your own Youtube – Part 6 - July 6, 2016
- Introducing Laravel Password v1.0 - July 3, 2016
- How to build your own Youtube – Part 5 - June 28, 2016
- How to build your own Youtube – Part 4 - June 23, 2016
- How to build your own Youtube – Part 3 - June 15, 2016
- How to build your own Youtube – Part 2 - June 8, 2016
- How to build your own Youtube – Part 1 - June 1, 2016