How to build your own Youtube – Part 6
Introduction: If you missed the earlier parts, in this series we are covering how to build your own YouTube clone, Click here.
Note: You need to have at least some prior experience with client-side Javascript frameworks and Node.js to get the most out of this tutorial.
In the previous post, we looked at chunked video uploading, saving more video details, assigning tags to a video, video transformations like removing audio, displaying video dimensions, changing video background and also delivering the videos. Now, we’ll be looking at video resizing & cropping, renaming, trimming, deleting, concatenating, rotating, and creating rounding corners/circular videos.
Video Resizing & Cropping
You can resize and crop videos in order to match the graphic design of your web site or mobile app. Whether videos are uploaded in your server-side code or by your users, the originals are stored in the cloud. You can then dynamically create multiple resized, cropped and manipulated videos on-the-fly and deliver them via dynamic URLs or use code to either add video tags or build the URLs.
Change the size of a video with the width and height parameters (w and h in URLs). You can resize the video by using both the width and height parameters or with only one of them (the other dimension is automatically updated to maintain the aspect ratio).
- Using an integer value sets the new dimension to that number in pixels. For example,
w_150sets the width to exactly 150 pixels. - Using a decimal value sets the new dimension as a multiple of the original dimension. For example,
w_0.5sets the width to half the original width.
So, resizing an uploaded video will be in this format:
|
1 |
http://res.cloudinary.com/demo/video/upload/w_150,h_100/dog.mp4 |
Step 1: Add resizeVideo method
Open up server/controllers/upload.server.controller.js and add this like so:
|
1 2 3 4 5 6 7 8 9 10 11 12 13 |
resizeVideo: function(req, res) { var videoUrl = req.body.url; var publicId = req.params.public_id; var width = req.body.width; var height = req.body.height; var format = req.body.format; /** * You can alternatively use the cloudinary method like so: cloudinary.video("dog.mp4", {width: 150, height: 100}) */ var response = videoUrl.split("upload")[0].concat("upload/w_" + width + ",h_" + height + "/" + publicId + "." + format ); return response; } |
Step 2: Update updateVideoDetails method
Open up server/controllers/video.server.controller.js and add the resizeVideo method this like so:
|
1 2 3 4 5 6 7 8 9 10 11 12 13 14 15 16 17 18 19 20 21 22 23 24 25 26 27 28 29 30 |
updateVideoDetails: function(req, res) { var publicId = req.params.public_id; var videoDetails = req.body; Upload.tagVideos(req, res); var resizeVideoUrl = Upload.resizeVideo(req, res); if(req.body.audio) { var newVideoUrl = Upload.removeAudio(req, res); } if(req.body.videoBackground) { var coloredVideoUrl = Upload.changeBackground(req, res); console.log("Colored Video Url", coloredVideoUrl); } Video.update({public_id : publicId}, videoDetails, function (err) { if(err) { return res.status(404).json({success: false, message: 'User Details Not Found', err: err}); } else { return res.status(200).json({ success: true, message: 'Update Successful', audioUrl: newVideoUrl, colorVideoUrl: coloredVideoUrl, resizeVideoUrl: resizeVideoUrl }); } }); } |
Here, we are calling the resizeVideo method and returning the response to a variable, then we are returning that URL back to the frontend.
Step 3: Capture the resizeVideoUrl in Transform Controller
Open up public/js/controllers/transform.client.controller.js and update this part of the updateVideo scope method like so:
|
1 2 3 4 5 6 7 8 9 10 |
Video.updateVideoDetails($routeParams.id, videoDetails, function(success, data){ if(success) { toastr.success(data.message, { timeOut: 7000 }); $scope.videoDetails.preview = data.audioUrl; $scope.videoDetails.colorPreview = data.colorVideoUrl; $scope.videoDetails.resizedVideo = data.resizeVideoUrl; } else { toastr.error( data.message, 'Error', { timeOut: 2000 }); } }); |
$scope.videoDetails.resizedVideo = data.resizeVideoUrl , this is the code we added. It’s storing the returned resizeVideoUrl to a scope variable.
Step 4: Update the edit_video HTML Template
Open up views/pages/edit_video.client.view.html and add this just after the video background color preview div like so:
|
1 2 3 4 5 6 7 8 |
<div class="col-md-8"> <div class="form_controls"> <div class="preview"> <label> Resized Video </label> <video controls ngf-src="videoDetails.resizedVideo" autoplay="autoplay"> </div> </div> </div> |
Now, we’ll add a width and height slider and make the textbox read-only like so:
|
1 2 3 4 5 6 7 8 |
<div class="form_group"> <label path="title"> Width: </label> <input type="range" min="0" max="2000" ng-model="videoDetails.width"> <input type="text" placeholder="width" readonly ng-model="videoDetails.width"><br/> <label path="title"> Height: </label> <input type="range" min="0" max="2000" ng-model="videoDetails.height"> <input type="text" placeholder="height" readonly ng-model="videoDetails.height"> </div> |
Now, our edit page for each video should look like this:
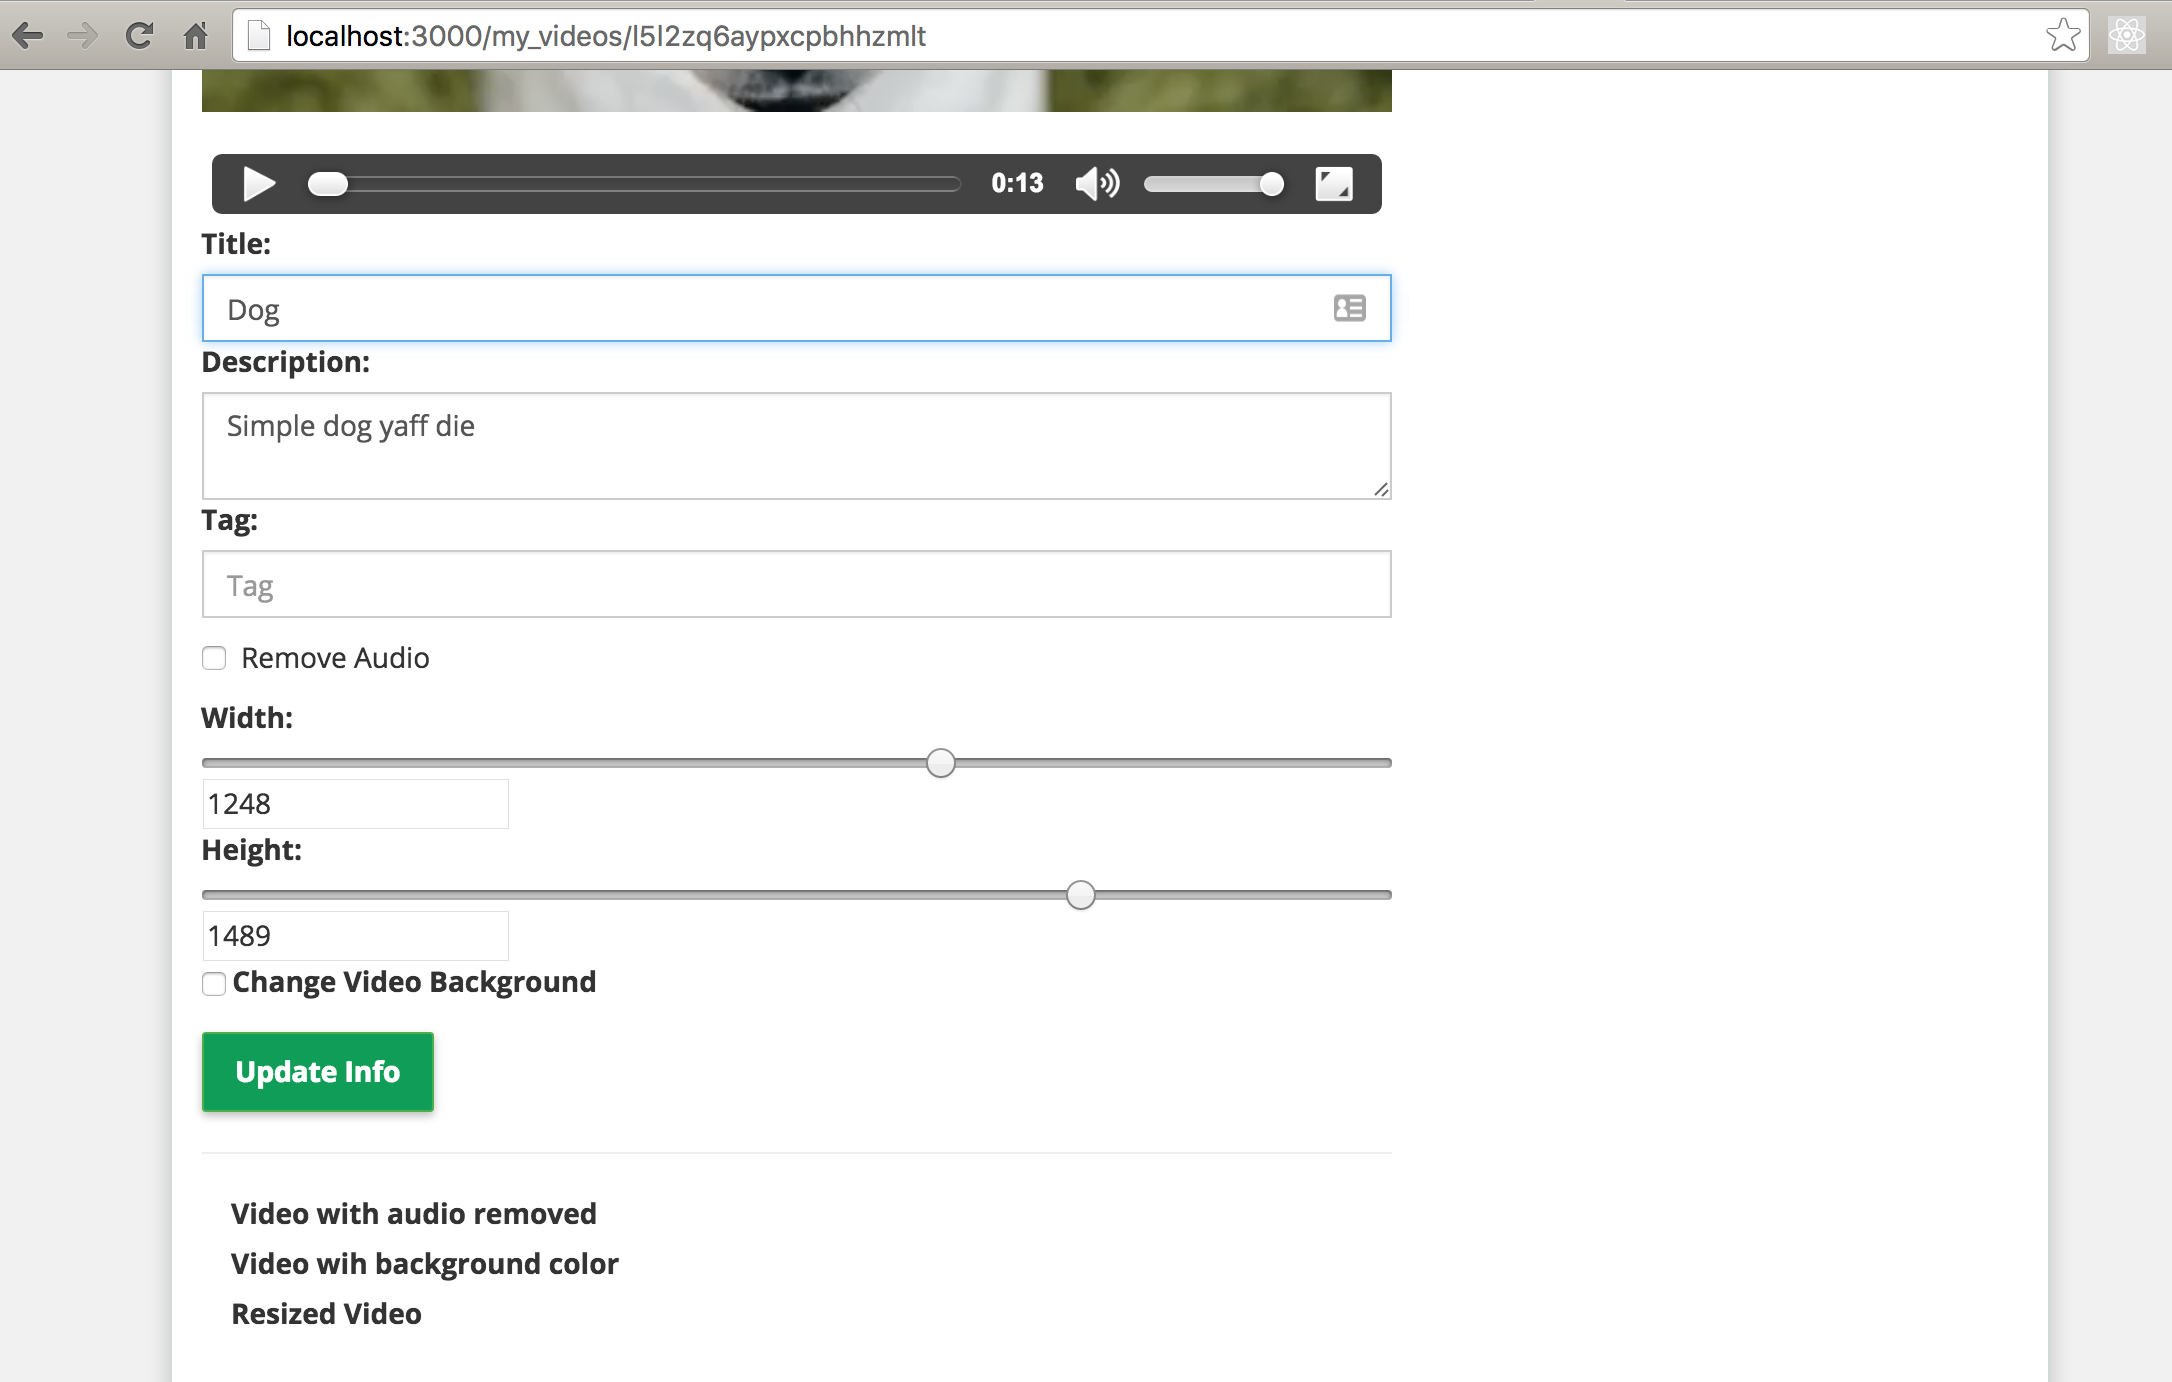
If you update a video, you will see the preview of the resized video!
Cloudinary supports the following video cropping modes: scale, fit, fill, limit, pad, lpad and crop.
Renaming Videos
Renamed videos are immediately and permanently updated in your cloud storage and existing URLs of videos and associated derived videos are modified, while videos and transformed videos already downloaded by visitors of your website might still be accessible for a certain period of time through cached copies on the CDN. Cloudinary’s client libraries wrap the API and simplify the renaming with the rename method. For example, renaming a video with the public ID of l5l2zq6aypxcpbhhzmlt to cute_dog will happen like so:
|
1 2 3 |
cloudinary.uploader.rename(<span class="string"><span class="delimiter">'l5l2zq6aypxcpbhhzmlt</span><span class="delimiter">'</span></span>, <span class="string"><span class="delimiter">'</span><span class="content">cute_dog</span><span class="delimiter">'</span></span>, <span class="keyword">function</span>(result) { console.log(result) }, { <span class="key">resource_type</span>: <span class="string"><span class="delimiter">"</span><span class="content">video</span><span class="delimiter">"</span></span> }) |
It’s that simple! You can experiment with that on your own.
Trimming Videos
A perfect use case for this is preventing a user from seeing a graphic part of a video or letting a user see only the most important part of a video. Cloudinary allows you to trim videos with a very seemingly easy technique.
Trim a video by using a combination of the following 3 parameters to specify the section of video to keep after trimming:
start_offset(soin URLs) specifies the start.end_offset(eoin URLs) specifies the end.duration(duin URLs) specifies the duration.
Possible values:
- A float representing the time in seconds e.g.
5.44(5 seconds and 440 milliseconds) - A string representing the percentage of the video length. This string consists of a number with a
pappended e.g.35p(0p is the first frame and 100p is the last frame). The client libraries also support appending a%instead of ap.
Trimming a video is actually very exciting. It’s one of my favorite features. Let’s experiment with it in our app.
Step 1: Add trimVideo method
Open up server/controllers/upload.server.controller.js and add this like so:
|
1 2 3 4 5 6 7 8 9 10 11 |
trimVideo: function(req, res) { var videoUrl = req.body.url; var publicId = req.params.public_id; var startOffset = req.body.so; var duration = req.body.duration; var format = req.body.format; /** You can alternatively use the Cloudinary NodeJS library option like so cloudinary.video("dog.mp4", {start_offset: "10p", duration: "30p"}) **/ var response = videoUrl.split("upload")[0].concat("upload/so_" + startOffset + "p,du_" + duration + "p/" + publicId + "." + format ); return response; } |
Step 2: Update updateVideoDetails method
Open up server/controllers/video.server.controller.js and add the trimVideo method this like so:
|
1 2 3 4 5 6 7 8 9 10 11 12 13 14 15 16 17 18 19 20 21 22 23 24 25 26 27 28 29 30 31 32 |
updateVideoDetails: function(req, res) { var publicId = req.params.public_id; var videoDetails = req.body; Upload.tagVideos(req, res); var resizeVideoUrl = Upload.resizeVideo(req, res); var trimVideoUrl = Upload.trimVideo(req, res); if(req.body.audio) { var newVideoUrl = Upload.removeAudio(req, res); } if(req.body.videoBackground) { var coloredVideoUrl = Upload.changeBackground(req, res); console.log("Colored Video Url", coloredVideoUrl); } Video.update({public_id : publicId}, videoDetails, function (err) { if(err) { return res.status(404).json({success: false, message: 'User Details Not Found', err: err}); } else { return res.status(200).json({ success: true, message: 'Update Successful', audioUrl: newVideoUrl, colorVideoUrl: coloredVideoUrl, resizeVideoUrl: resizeVideoUrl, trimVideoUrl: trimVideoUrl }); } }); } |
Here, we are calling the trimVideo method and returning the response to a variable, then we are returning that URL back to the frontend.
Step 3: Capture the trimVideoUrl and Update VideoDetails Object in Transform Controller
Open up public/js/controllers/transform.client.controller.js and update this part of the updateVideo scope method like so:
|
1 2 3 4 5 6 7 8 9 10 11 12 13 14 15 16 17 18 19 20 21 22 23 24 25 |
var videoDetails = { tag: $scope.videoDetails.tag, title: $scope.videoDetails.title, description: $scope.videoDetails.description, audio: $scope.videoDetails.audio, format: $scope.videoDetails.format, width: $scope.videoDetails.width, height: $scope.videoDetails.height, startOffset: $scope.videoDetails.startOffset, duration: $scope.videoDetails.duration, videoBackground: $scope.videoDetails.backgroundColor, url: $scope.videoDetails.url }; Video.updateVideoDetails($routeParams.id, videoDetails, function(success, data){ if(success) { toastr.success(data.message, { timeOut: 7000 }); $scope.videoDetails.preview = data.audioUrl; $scope.videoDetails.colorPreview = data.colorVideoUrl; $scope.videoDetails.resizedVideo = data.resizeVideoUrl; $scope.videoDetails.trimmedVideo = data.trimVideoUrl; } else { toastr.error( data.message, 'Error', { timeOut: 2000 }); } }); |
We added
$scope.videoDetails.trimmedVideo = data.trimVideoUrl and also startOffset,duration to videoDetails object. It’s storing the returned trimVideoUrl to a scope variable.
Step 4: Update the edit_video HTML Template
Open up views/pages/edit_video.client.view.html and add this just after the resized video preview div like so:
|
1 2 3 4 5 6 7 8 9 10 |
<div class="row"> <div class="col-md-8"> <div class="form_controls"> <div class="preview"> <label> Trimmed Video </label> <video controls ngf-src="videoDetails.trimmedVideo" autoplay="autoplay"> </div> </div> </div> </div> |
Now, we’ll add a start offset and duration slider together with read-only textboxes like so:
|
1 2 3 4 5 6 7 8 |
<div class="form_group"> <label path="title"> Start Offset: % </label> <input type="range" min="10" max="100" ng-model="videoDetails.startOffset"> <input type="text" placeholder="start Offset" readonly ng-model="videoDetails.startOffset"><br/> <label path="title"> Duration: % </label> <input type="range" min="5" max="100" ng-model="videoDetails.duration"> <input type="text" placeholder="duration" readonly ng-model="videoDetails.duration"> </div> |
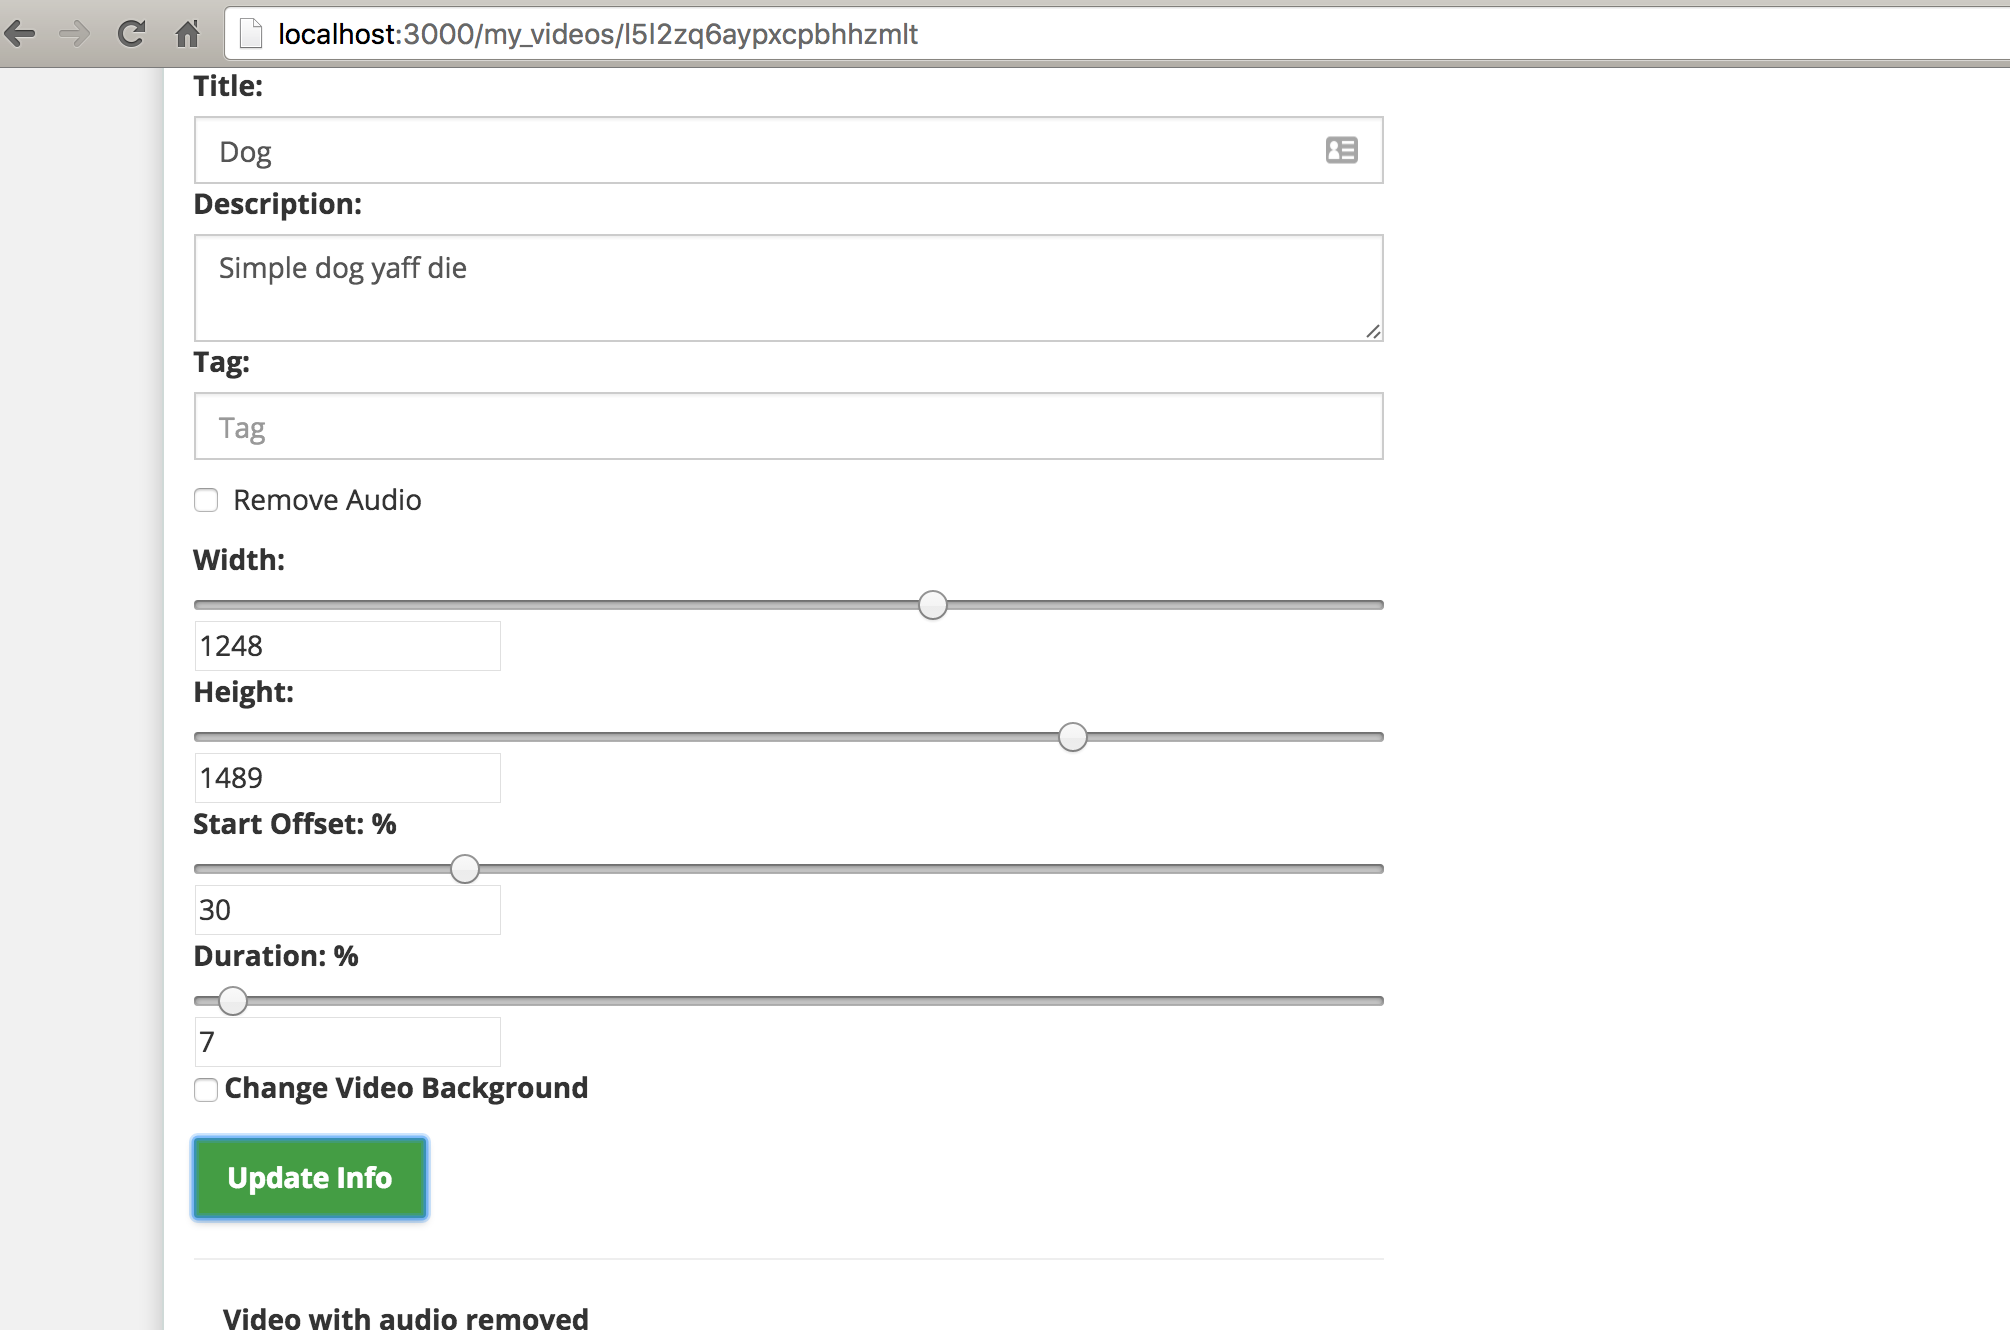
Now, try it out, update a video and watch the preview of the trimmed video. You’ll discover the trimmed video didn’t start from the beginning & it also goes as long as the duration you specified. 
Deleting Videos
Deleted videos are immediately and permanently deleted from your cloud storage. However, videos and transformed videos already downloaded by visitors to your website might still be accessible for a few more days through cached copies on the CDN (using cache invalidation will cut this time down to up to one hour). Cloudinary’s client libraries wrap the API and simplify the deleting with the destroy method. For example, deleting a video with the public ID of “dog” will be implemented like so:
|
1 2 |
cloudinary.uploader.destroy(<span class="string"><span class="delimiter">'</span><span class="content">dog</span><span class="delimiter">'</span></span>, <span class="keyword">function</span>(result) { console.log(result) }, { <span class="key">resource_type</span>: <span class="string"><span class="delimiter">"</span><span class="content">video</span><span class="delimiter">"</span></span> }); |
Implementation in Yourtube App
Step 1: Install angular-bootstrap-confirm
We’ll use the angular-bootstrap-confirm directive to bring up a Yes/No confirm modal to ensure the user actually wants to delete a video. Run this command in your terminal like so:
|
1 |
bower install --save angular-bootstrap-confirm |
Now, reference it in your index.html like so
|
1 |
<script src="vendor/angular-bootstrap-confirm/dist/angular-bootstrap-confirm.js"></script> |
Open up public/js/app.js and add the module dependency ‘mwl.confirm’
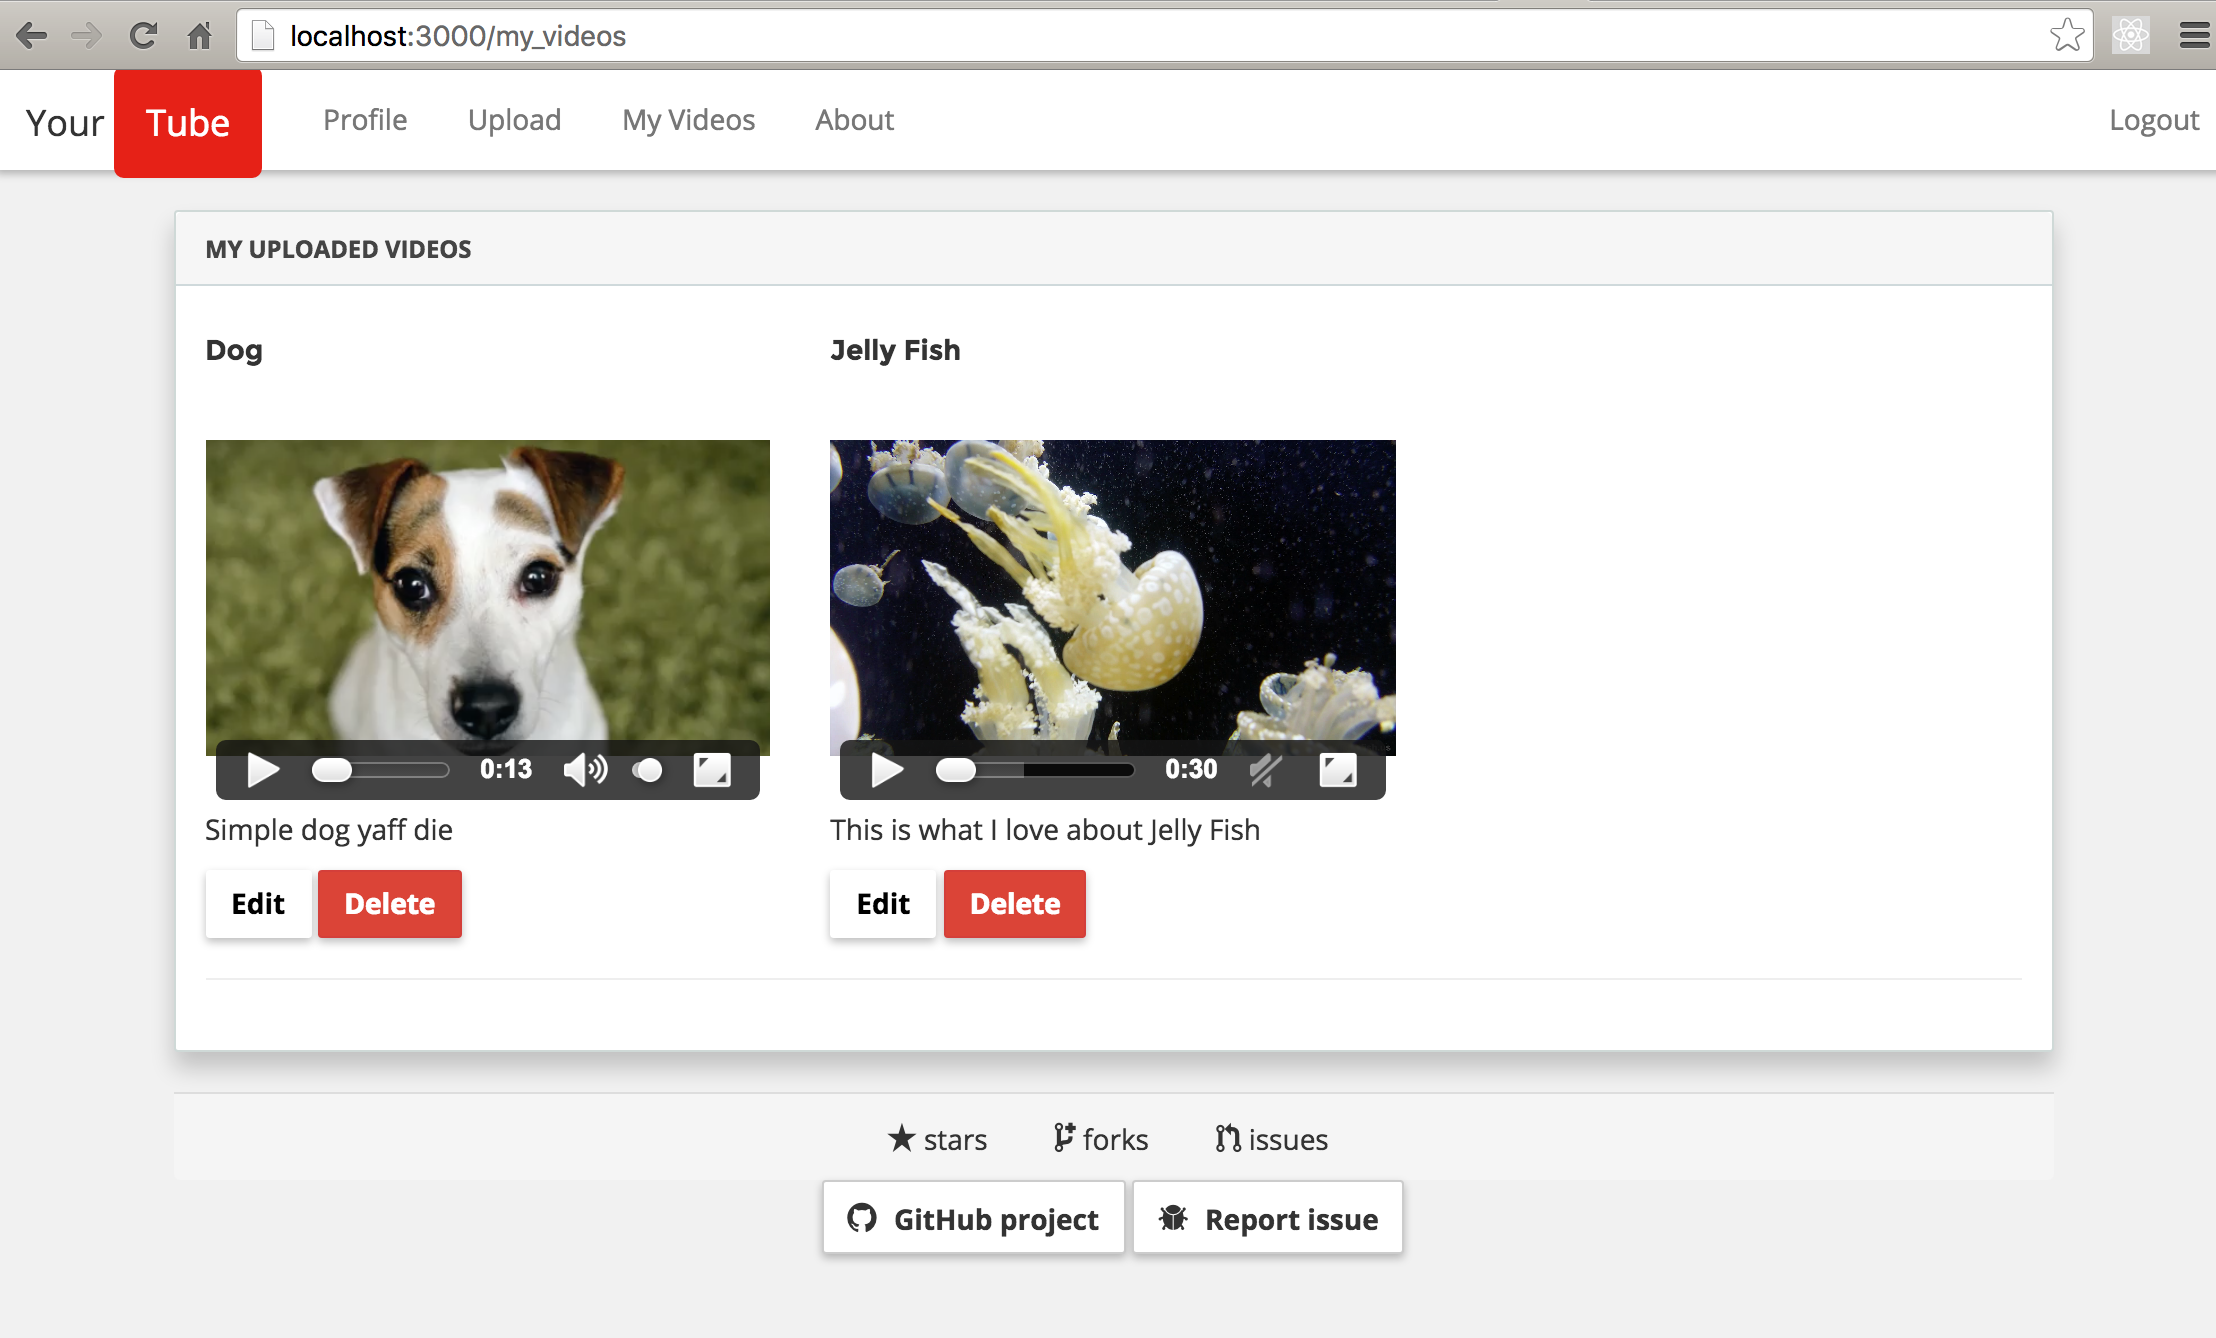
Step 2: Add Delete button
Open up public/views/pages/my_videos.client.view.html and add the button just after the edit link like so:
|
1 2 3 4 5 6 7 8 9 10 11 12 13 14 15 |
<button class="btn btn-danger" mwl-confirm title="{{ vm.title }}" message="{{ vm.message }}" confirm-text="{{ vm.confirmText }}" cancel-text="{{ vm.cancelText }}" placement="{{ placement }}" on-confirm="deleteVideo(videos.public_id)" on-cancel="vm.cancelClicked = true" confirm-button-type="danger" cancel-button-type="default" > Delete </button> |
The button directive is from the angular-bootstrap-confirm directive.
Scroll up to the top-most div in this file and the ng-init directive with value like so:
|
1 |
ng-init="vm = {title: 'Are you sure?', message: 'Are you really <b>sure</b> you want to do this?', confirmText: 'Yes <i class=\'glyphicon glyphicon-ok\'></i>', cancelText: 'No <i class=\'glyphicon glyphicon-remove\'></i>'}"> |
Step 3: Add deleteVideo function to VideoController
Open up public/js/controllers/video.client.controller.js and the method like so:
|
1 2 3 4 5 6 7 8 9 10 11 |
$scope.deleteVideo = function(public_id) { Video.deleteVideo(public_id, function(success, data){ if(success){ toastr.success(data.message, { timeOut: 1000 }); $window.location.assign('/my_videos'); } else{ toastr.error("Error occurred. Update Failed", 'Error', { timeOut: 2000 }); } }); }; |
Make sure you don’t forget to inject the $window AngularJS directive. Now, let’s create a deleteVideo method in our Video Service.
Step 4: Add deleteVideo method to VideoService
Open up public/js/services/video.client.service.js and add the method like so:
|
1 2 3 4 5 6 7 8 9 10 |
deleteVideo: function(id, cb){ $http.delete('/api/video/' + id).then( function(response){ if(response.data.success){ cb(true, response.data); } else { cb(false, response.data); } }); }, |
Step 5: Add the delete method to Server route
Open up server/routes.js and add this:
|
1 |
app.delete('/api/video/:public_id', token.ensureAuthenticated, Video.deleteVideo); |
Step 6: Add deleteVideo method to Server Controller
Open up server/controllers/video.server.controller.js and add this method like so:
|
1 2 3 4 5 6 7 8 9 10 11 12 13 14 15 16 17 18 19 20 21 |
/** * Delete A Video * @param req * @param res * @param next * @return Void */ deleteVideo: function(req, res){ var publicId = req.params.public_id; Upload.deleteVideo(req,res); Video.remove({public_id: publicId}, function (err, user) { if(err) { return res.status(404).json({success: false, message: err.message }); } return res.json({success: true, message: 'Video Deleted Successfully'}); }); }, |
You’ll discover that we have a deleteVideo method from the Upload Server Controller. Let’s build that in the next step.
Step 7: Add deleteVideo method to Server Upload Controller
Open up server/controllers/upload.server.controller.js and add this method like so:
|
1 2 3 4 5 6 7 |
deleteVideo: function(req, res) { var publicId = req.params.public_id; cloudinary.uploader.destroy(publicId, function(result) { console.log(result); }, { resource_type: "video" }); } |
Here, we are receiving the public_id of the video from the front-end to be able to identify it on Cloudinary’s server and delete it permanently.
Now try to delete a video
Concatenating Videos
There are several reasons you might want to concatenate videos. One very obvious reason that comes to mind is adding an advert or promotional video for every video that is added on “Yourtube” or whatever video platform you are building.
Cloudinary supports the concatenation of videos by using the overlay video parameter (l_video: in URLs) to specify the name of another uploaded video and then the splice flag (fl_splice in URLs) to indicate that the video should be concatenated on to the container video and not added as an overlay.
Note that the videos spliced together must be the same width and height. You can use size transformation parameters to ensure that both videos match in size (w and h).
For example, to concatenate the video named cartoon on to the end of the video named dog_chilling, with both videos set to a width of 300 pixels and a height of 200 pixels:
|
1 |
http://res.cloudinary.com/demo/video/upload/w_300,h_200,c_fill/l_video:cartoon,fl_splice,w_300,h_200,c_fill/dog_chilling.mp4 |
To concatenate only a section of a video on to another video use the offset parameters like we did when we trimmed the videos earlier together with the layer_apply flag (fl_layer_apply in URLs). For example, to splice the first 5 seconds of the video named dog to the end of the same video named dog rotated by 180 degrees, with both videos set to a width of 300 pixels and a height of 200 pixels, you can use the REST API like so:
|
1 |
http://res.cloudinary.com/demo/video/upload/a_180/w_300,h_200,c_fill/l_video:dog,fl_splice,w_300,h_200,c_fill/fl_layer_apply,so_0,du_5/dog.mp4 |
or the Node.js Cloudinary API method:
|
1 2 3 4 5 6 |
cloudinary.video("dog.mp4", {transformation: [ {angle: 180}, {width: 300, height: 200, crop: "fill"}, {overlay: "video:dog", flags: "splice", width: 300, height: 200, crop: "fill"}, {flags: "layer_apply", start_offset: "0", duration: "5"} ]}) |
You can also Concatenate Video with Image
For example, to concatenate the image named sample to the start of the video named dog for a duration of 3 seconds (both the video and image are scaled to a width of 300 pixels and a height of 200 pixels): You can do it like so:
|
1 2 3 4 5 |
cloudinary.video("dog.mp4", {transformation: [ {width: 300, height: 200}, {width: 300, height: 200, overlay: "sample", flags: "splice", duration: "3"}, {start_offset: "0", flags: "layer_apply"} ]}) |
Rotating Videos
You also have the ability to rotate videos. A video might be shot or recorded at an angle where a user will have to rotate the camera or viewing device to a certain angle to be able to watch the video properly. Well, Cloudinary can save you the headache of having you/users to turn around their precious device every time.
Rotate a video by any arbitrary angle in degrees with the angle parameter (a in URLs). If the angle is not a multiple of 90 then a rectangular bounding box is added containing the rotated video and empty space.
For example, let’s rotate a video by 90 degrees. With NodeJS, it’s as simple as:
|
1 |
cloudinary.video(<span class="string"><span class="delimiter">"</span><span class="content">dog.mp4</span><span class="delimiter">"</span></span>, {<span class="key">angle</span>: <span class="integer">90</span>}) |
If we rotate by 20%, we will have something like this:
Rounding Corners and creating circular videos
Transforming a video to a rounded version is done using the radius parameter (r in URLs) set to the number of pixels the radius of all four corners should be. For example, the uploaded mp4 video named dog resized to a width of 300 pixels and with rounded corners set to a radius of 20 pixels: Via the URL method, you’ll have something like so w_300 and r_30. Really very explanatory
|
1 |
http://res.cloudinary.com/demo/video/upload/w_300,r_30/dog.mp4 |
In Nodejs, you can use this method from the Cloudinary library like so:
|
1 |
cloudinary.video("dog.mp4", {width: 300, radius: 30}) |
You can also crop the shape of the video to an ellipse like so:
|
1 |
cloudinary.video("dog.mp4", {width: 300, radius: "max"}) |
You can also change the background color of the video from the default white color to any color you prefer like so:
|
1 |
http://res-5.cloudinary.com/demo/video/upload/w_300,h_300,c_fill,b_blue,r_max/dog.webm |
OR the NodeJS library like so:
|
1 |
cloudinary.video("dog.mp4", {width: 300, height: 300, background: "blue", radius: "max", crop: "fill"}) |
These methods are really simple to use!!!
The radius parameter can also be used to round the corners of overlays, which are then also given a transparent background. For example, the uploaded mp4 video named dog overlaid on the same video named dog with width set to 100 pixels, maximum radius cropping and north east gravity will work so:
|
1 |
http://res.cloudinary.com/demo/video/upload/w_300/l_video:dog,w_100,g_north_east,r_max/dog.mp4 |
or via Nodejs Cloudinary library like so:
|
1 2 3 4 |
cloudinary.video("dog.mp4", {transformation: [ {width: 300}, {overlay: "video:dog", width: 100, gravity: "north_east", radius: "max"} ]}) |
Check out this video below for a brief overview!
Conclusion
In this post, we have looked at video resizing & cropping, renaming, trimming, deleting, concatenating, rotating, and creating rounding corners/circular videos.
In the next post, we’ll look at Transcoding videos, Quality control, Bit rate control, Video codec settings, Generating Video thumbnails, Adding image overlays, Adding Video Overlays, Adding text captions, and Adding subtitles.
The source code for this project is on GitHub.
If you have any questions or observations, please drop your thoughts in the comment section below
- How to build your own Youtube – Part 10 - August 1, 2016
- How to build your own Youtube – Part 9 - July 25, 2016
- How to build your own Youtube – Part 8 - July 23, 2016
- How to build your own Youtube – Part 6 - July 6, 2016
- Introducing Laravel Password v1.0 - July 3, 2016
- How to build your own Youtube – Part 5 - June 28, 2016
- How to build your own Youtube – Part 4 - June 23, 2016
- How to build your own Youtube – Part 3 - June 15, 2016
- How to build your own Youtube – Part 2 - June 8, 2016
- How to build your own Youtube – Part 1 - June 1, 2016