How to build your own Youtube – Part 5
Introduction: If you missed the earlier parts, in this series we are covering how to build your own YouTube clone, Click here.
Note: You need to have at least some prior experience with client-side Javascript frameworks and Node.js to get the most out of this tutorial.
We have been able to upload some video, but those video files we experimented with are actually very small files. How do we deal with large video files?
Chunked Video Upload
As users, when you try to upload a large file, you experience timeouts over and over again. Let’s look at a better way to upload large video files.
Cloudinary offers a better method to upload large files, which offers a degree of tolerance for network issues. It allows video files to be uploaded in chunks.
By default, chunk size defaults to 20 Megabytes but can be set to as low as 5 Megabytes by using the chunk_size parameter. Let’s take a spin!
Step 1: Set up a new branch
If you haven’t been committing to git, please do. Check out into a new branch, maybe called chunk-video-upload.
Step 2: Use the upload_large method
Open up server/controllers/upload.server.controller.js
In the uploadVideo method, we’ll switch up the Cloudinary upload method with the upload_large method like so:
Current – upload
|
1 2 3 |
cloudinary.uploader.upload(file.path, function(response){ return res.json({ response: response }); }, { resource_type: "video" }); |
New – upload_large
|
1 2 3 |
cloudinary.uploader.upload_large(file.path, function(response){ return res.json({ response: response }); }, { resource_type: "video" }); |
Now, try to upload a file larger than the previous ones that have been uploaded.
Let’s set the chunk size to 10 Megabytes like so:
|
1 2 3 |
cloudinary.uploader.upload_large(file.path, function(response){ return res.json({ response: response }); }, { resource_type: "video", chunk_size: 10000000 }); |
Are you surprised that it’s that simple?…That’s all 
The source code for chunked video upload is here
Note: By default, the maximum video file size to upload is 50MB, you need to upgrade to a paid plan if you want to upload larger file sizes.
Video Transformations
Let’s perform some nice video transformations on our yourtube platform. We want to be able to tag the video, change the background of the video and also remove audio from the video.
Next, Let’s create a section to view the videos a user has uploaded.
Step 3: Open up your index.html file and add a new nav item like so:
|
1 |
<li ng-if="isAuthenticated()"><a href="/my_videos">My Videos</a></li> |
Step 4: Open up your server/models/video.server.model.js and update it like so:
|
1 2 3 4 5 6 7 8 9 10 11 12 13 14 15 |
var mongoose = require('mongoose'), videoSchema = mongoose.Schema({ title: { type: String }, public_id: { type: String, required: true }, description: { type: String, required: true }, url: { type: String, required: true }, duration: { type: Number, required: true }, format: { type: String, required: true }, width: { type: Number, required: true }, height: { type: Number, required: true }, uploaded_by: { type: String, required: true }, time_uploaded: { type: Date, default: Date.now } }); module.exports = mongoose.model('Video', videoSchema, 'videos'); |
From what’s obtainable above, we have added new fields to our Video Schema. In a real-life production environment, you should consider using migrations to change or add anything in your Schema.
Step 5: Create a new file my_videos.client.view.html in public/views/pages and add this to it like so:
|
1 2 3 4 5 6 7 8 9 10 11 12 13 14 15 16 17 18 19 20 21 22 23 24 25 26 27 28 29 30 31 32 33 34 35 36 37 38 39 40 41 42 43 |
<div class="container"> <div class="panel panel-default"> <div class="panel-heading">MY UPLOADED VIDEOS</div> <div class="panel-body"> <div class="row" ng-controller="VideoController"> <div class="col-sm-4" ng-repeat="videos in myVideos" class="bs-callout"> <h5>{{ videos.title }}</h5> <!-- 4:3 aspect ratio --> <div class="embed-responsive embed-responsive-4by3"> <video width="320" height="240" poster="" controls > <source ng-src="{{ videos.url | trustUrl }}" type="video/webm"> <source ng-src="{{ videos.url | trustUrl }}" type="video/mp4"> <source ng-src="{{ videos.url | trustUrl }}" type="video/ogg"> Your browser does not support the video tag. </video> </div> <p> {{ videos.description }}</p> <a href="/my_videos/{{ videos.public_id }}" class="btn" /> Edit </a> </div> </div> <hr /> </div> </div> <div class="panel-footer text-center"> <ul class="list-inline"> <li><i class="ion-star"></i> stars</li> <li><i class="ion-fork-repo"></i> forks</li> <li><i class="ion-pull-request"></i> issues</li> </ul> </div> </div> </div> <div class="text-center"> <a class="btn btn-default" href="https://github.com/goodheads/yourtube"><i class="ion-social-github"></i> GitHub project</a> <a class="btn btn-default" href="https://github.com/goodheads/yourtube/issues/new"><i class="ion-bug"></i> Report issue</a> </div> </div> |
Here, you’ll discover that we are using a VideoController. Next, let’s create that.
Step 6: Create a file video.client.controller.js and add this to it like so:
|
1 2 3 4 5 6 7 8 9 10 11 12 13 14 |
app.controller('VideoController', ['$scope','$http','$localStorage','toastr', 'Video', function($scope, $http, $localStorage, toastr, Video) { $scope.listMyVideos = function() { Video.retrieveMyVideos($localStorage.email, function(success, data) { if(success) { $scope.myVideos = data.videos; } else { toastr.error( data.message, 'Error', { timeOut: 2000 }); } }); }; $scope.listMyVideos(); }]); |
Note: Don’t forget to link this file in index.html. If you don’t your app won’t recognize the VideoController.
Here, we have the retrieveMyVideos method from the Video service that returns all videos uploaded by someone. The $localStorage.email fetches the person’s email from localStorage.
So many moving parts? Don’t worry, It will all make sense soon
Step 7: Open up public/js/services/video.client.service.js and add this method to it like so:
|
1 2 3 4 5 6 7 8 9 10 |
retrieveMyVideos: function( email, cb ){ return $http.get('/api/videos/?uploaded_by=' + email).then( function(response){ if(response.data.success){ cb(true, response.data); } else{ cb(false, response.data); } }); }, |
Here, we are making use of query strings to fetch all videos uploaded by a particular user from the backend. Next, let’s tweak a method in the server controller to accommodate this new query string behavior.
Step 8: Open up server/controllers/video.server.controller.js and update the retrieveAll method like so:
|
1 2 3 4 5 6 7 8 9 10 11 12 13 14 15 16 17 18 19 20 21 22 23 24 25 26 |
/** * Fetch All Videos that have been uploaded * @param {void} req * @param {void} res * @return {object} */ retrieveAll: function( req, res, next){ if(req.query.uploaded_by === undefined) { Video.find({}, function(err, videos) { if(err) { return res.status(500).json({ message: err.message }); } return res.status(200).json(videos); }); } else { // fetch all videos that have been uploaded by the logged in user Video.find({ uploaded_by: req.query.uploaded_by }, function(err, videos) { if(err) { return res.status(500).json({ message: err.message }); } return res.status(200).json({ success: true, videos: videos }); }); } }, |
If the query parameter uploaded_by is present, it goes ahead to query the Video Schema with the new parameter.
Step 9: Open up public/js/controllers/auth.client.controller.js and update it like so:
|
1 2 3 4 5 6 7 8 9 10 11 12 13 14 15 16 17 18 19 20 21 22 23 24 25 26 27 |
app.controller('AuthController', ['$scope','$location','$auth','$localStorage', 'toastr', function($scope, $location, $auth, $localStorage, toastr) { $scope.login = function() { $auth.login($scope.user) .then(function() { $localStorage.email = $scope.user.email; toastr.success('You have successfully signed in!'); $location.path('/'); }) .catch(function(error) { toastr.error(error.data.message); }); }; $scope.signup = function() { $auth.signup($scope.user) .then(function(response) { $auth.setToken(response); $location.path('/'); toastr.info('You have successfully created a new account and have been signed-in'); }) .catch(function(response) { console.log(response); toastr.error(response.data.message); }); }; }]); |
What changed? Here, we inject the $localStorage service and also added this line of code.
|
1 |
$localStorage.email = $scope.user.email; |
Once a user logs in now, it stores the email of the user in the browser local Storage for later use.
Step 10: Open up public/js/controllers/upload.client.controller.js and update it like so:
|
1 2 3 4 5 6 7 8 9 10 11 12 13 14 15 16 17 18 19 20 21 22 23 24 25 26 27 28 29 30 31 32 33 34 35 36 37 38 39 40 41 42 43 44 45 46 47 48 49 50 51 52 53 54 55 56 57 58 59 60 61 62 63 64 65 66 67 68 69 70 71 72 |
app.controller('UploadController', ['$scope', '$localStorage', 'toastr', 'Upload', 'Video', /* Uploading with Angular File Upload */ function($scope, $localStorage, toastr, Upload, Video) { $scope.uploadFiles = function(files){ $scope.files = files; if (!$scope.files) return; angular.forEach(files, function(file){ if (file && !file.$error) { file.upload = Upload.upload({ url: "/api/upload", method: "POST", data: { file: file, } }).progress(function (e) { file.status = "Uploading...Processing..."; file.progress = Math.round((e.loaded * 100.0) / e.total); }).success(function (data, status, headers, config) { file.status = "Done...100%. Draft Saved! Now, Hit the Publish Button to go live when you are ready"; file.result = data; console.log(data.response); var details = { title: $scope.video === undefined ? 'Default title' : $scope.video.title, public_id: data.response.public_id, description: $scope.video === undefined ? 'Default description' : $scope.video.description, url: data.response.secure_url, duration: data.response.duration, format: data.response.format, width: data.response.width, height: data.response.height, uploaded_by: $localStorage.email }; Video.create(details, function(success, data){ if(success){ toastr.success(data.message, { timeOut: 3000 }); }else{ toastr.error(data.message, 'Error', { timeOut: 2000 }); } }); file.status = "Your Video is live now!"; console.log(data); }).error(function (data, status, headers, config) { file.result = data; }); } }); }; /* Modify the look and fill of the dropzone when files are being dragged over it */ $scope.dragOverClass = function($event) { var items = $event.dataTransfer.items; var hasFile = false; if (items !== null) { for (var i = 0 ; i < items.length; i++) { if (items[i].kind == 'file') { hasFile = true; break; } } } else { hasFile = true; } return hasFile ? "dragover" : "dragover-err"; }; }]); |
Here you’ll discover we are storing more details about a video in this portion of the code
|
1 2 3 4 5 6 7 8 9 10 11 |
var details = { title: $scope.video === undefined ? 'Default title' : $scope.video.title, public_id: data.response.public_id, description: $scope.video === undefined ? 'Default description' : $scope.video.description, url: data.response.secure_url, duration: data.response.duration, format: data.response.format, width: data.response.width, height: data.response.height, uploaded_by: $localStorage.email }; |
Step 11: Open up public/js/routes.js and add this route like so:
|
1 2 3 4 5 6 |
.when('/my_videos', { templateUrl: './views/pages/my_videos.client.view.html', resolve: { loginRequired: loginRequired } }) |
Step 12: Refresh your page, logout, and log in a new user. Upload some new videos, then click on the My Videos nav item to see all the videos you have uploaded as the logged-in user.
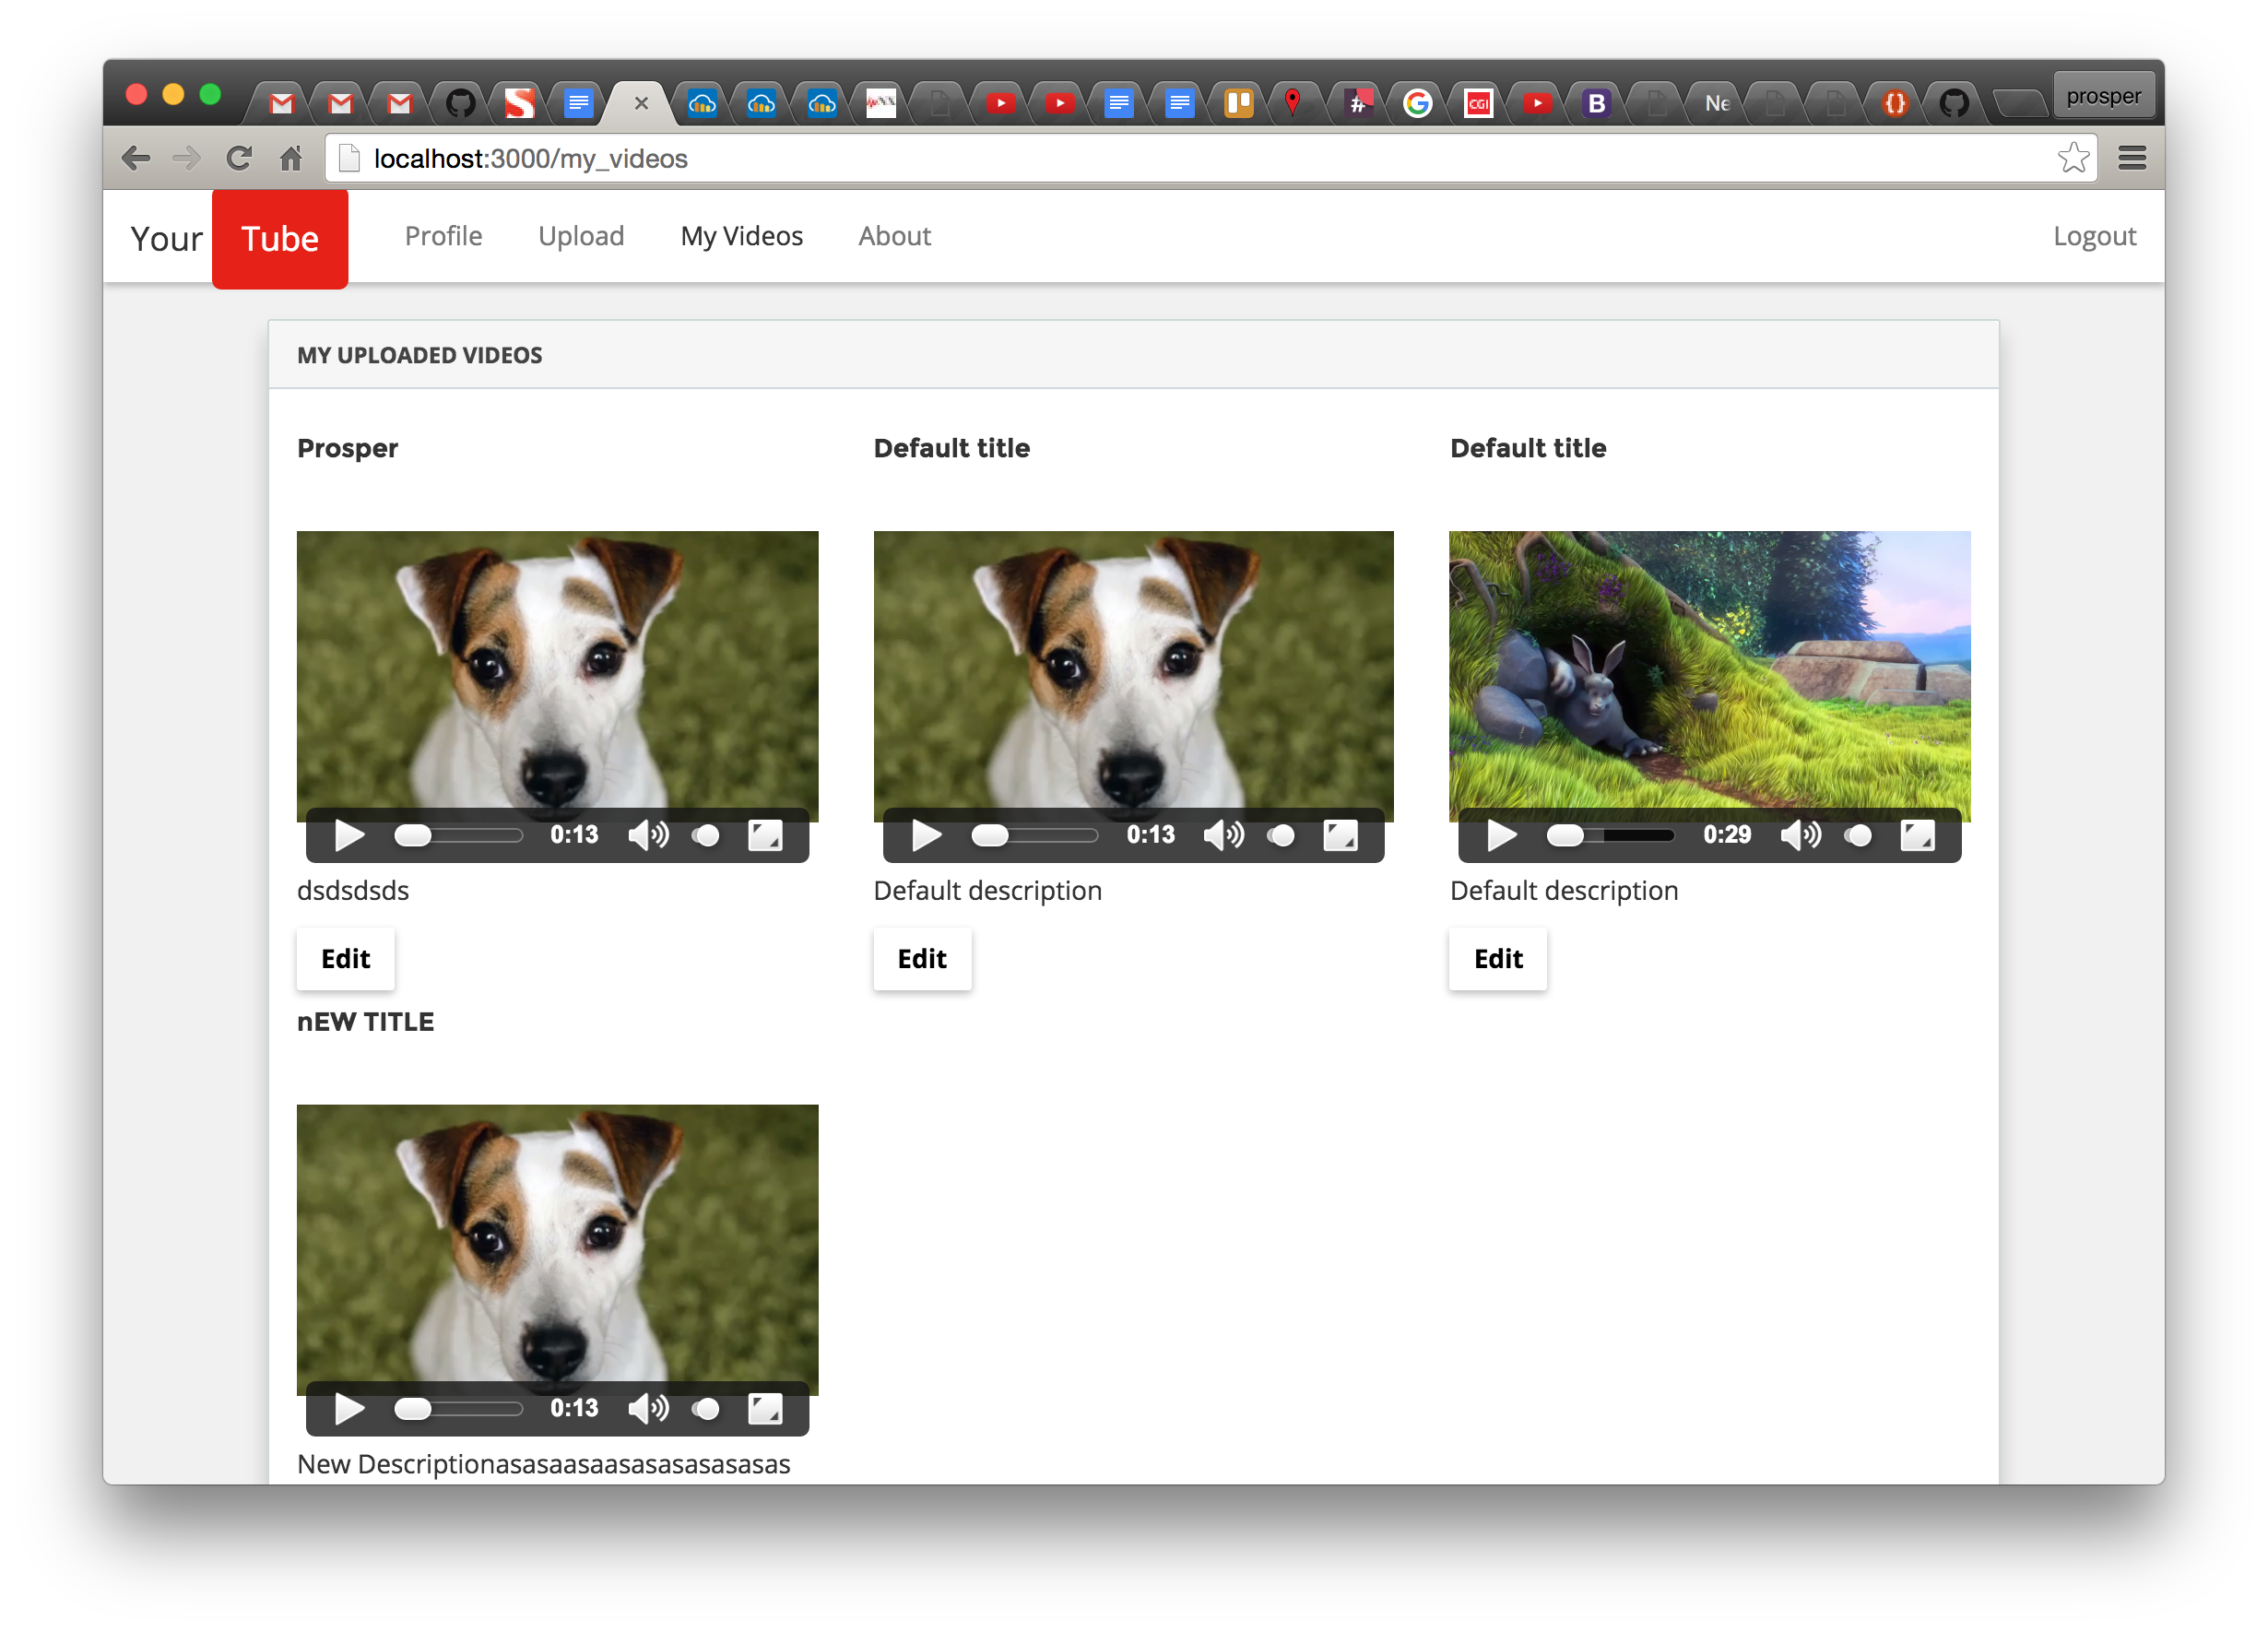
Next, we need to be able to click the “Edit” button and it should redirect to a new page with that particular video and the options to update the video and its content.
Step 13: Open up public/js/routes.js and add this route like so:
|
1 2 3 4 5 6 |
.when('/my_videos/:id', { templateUrl: './views/pages/edit_video.client.view.html', resolve: { loginRequired: loginRequired } }) |
Step 14: Create a file edit_video.client.view.html in public/views/pages directory and add this like so:
|
1 2 3 4 5 6 7 8 9 10 11 12 13 14 15 16 17 18 19 20 21 22 23 24 25 26 27 28 29 30 31 32 33 34 35 36 37 38 39 40 41 42 43 44 45 46 47 48 49 50 51 52 53 54 55 56 57 58 59 60 61 62 63 64 65 66 67 68 69 70 71 72 73 74 75 76 77 78 79 80 81 82 83 84 85 86 87 88 89 90 91 92 93 94 95 96 97 |
<div class="container"> <div class="panel panel-default"> <div class="panel-heading">TRANSFORM A VIDEO</div> <div class="panel-body"> <div class="row" ng-controller="TransformController"> <div class="col-sm-8" class="bs-callout"> <div class="embed-responsive embed-responsive-4by3"> <video width="320" height="240" ng-src="{{ videoDetails.url | trustUrl }}" poster="" controls > Your browser does not support the video tag. </video> </div> <form name="updateForm" ng-submit="updateVideo()"> <div class="form_group"> <label path="title"> Title: </label> <div class="form_controls"> <input type="text" class="form-control" placeholder="Title" ng-model="videoDetails.title" required autofocus> </div> </div> <input type="hidden" ng-model="videoDetails.format" > <div class="form_group"> <label path="title"> Description: </label> <div class="form_controls"> <textarea class="form-control" placeholder="Description" ng-model="videoDetails.description" required></textarea> </div> </div> <div class="form_group"> <label path="title"> Tag: </label> <div class="form_controls"> <input type="text" class="form-control" placeholder="Tag" ng-model="videoDetails.tag"> </div> </div> <div class="checkbox"> <label> <input type="checkbox" ng-model="videoDetails.audio"> Remove Audio </label> </div> <div class="form_group"> <label path="title"> Width: </label> <input type="text" placeholder="width" ng-model="videoDetails.width"> <label path="title"> Height: </label> <input type="text" placeholder="height" ng-model="videoDetails.height"> </div> <div class="form_group"> <label> <input type="checkbox" ng-model="videoDetails.background"> Change Video Background </label> </div> <div class="form_group"> <input type="text" class="form-control" placeholder="e.g Yellow" ng-show="videoDetails.background" ng-model="videoDetails.backgroundColor"> </div> <div class="form_group" style="margin-top:10px;"> <button class="btn btn-lg btn-success">Update Info</button> </div> </form> <hr/> <!-- Add this for video preview--> <div class="col-md-8"> <div class="form_controls"> <div class="preview"> <label> Video with audio removed </label> <video controls ngf-src="videoDetails.preview" autoplay="autoplay"> </div> </div> </div> <div class="col-md-8"> <div class="form_controls"> <div class="preview"> <label> Video wih background color </label> <video controls ngf-src="videoDetails.colorPreview" autoplay="autoplay"> </div> </div> </div> </div> </div> <hr /> </div> </div> </div> </div> </div> |
Boom!!! we have a new controller called TransformController. Let’s create that in the next step.
Step 15: Create a file transform.client.controller.js in public/js/controllers directory and add this to it like so:
|
1 2 3 4 5 6 7 8 9 10 11 12 13 14 15 16 17 18 19 20 21 22 23 24 25 26 27 28 29 30 31 32 |
app.controller('TransformController', ['$scope','$localStorage','$routeParams','Video', 'toastr', function($scope,$localStorage,$routeParams,Video,toastr) { Video.retrieveEachVideoDetails($routeParams.id, function(success, data){ if(success){ $scope.videoDetails = data.video; } }); $scope.updateVideo = function() { var videoDetails = { tag: $scope.videoDetails.tag, title: $scope.videoDetails.title, description: $scope.videoDetails.description, audio: $scope.videoDetails.audio, format: $scope.videoDetails.format, width: $scope.videoDetails.width, height: $scope.videoDetails.height, videoBackground: $scope.videoDetails.backgroundColor, url: $scope.videoDetails.url }; Video.updateVideoDetails($routeParams.id, videoDetails, function(success, data){ if(success) { toastr.success(data.message, { timeOut: 3000 }); $scope.videoDetails.preview = data.audioUrl; $scope.videoDetails.colorPreview = data.colorVideoUrl; } else { toastr.error( data.message, 'Error', { timeOut: 2000 }); } }); }; }]); |
Note: Don’t forget to link this file in index.html. If you don’t your app won’t recognize the TransformController.
We injected $routeParams service to enable the application get the id of the video in the Url. The Video service also has a new method updateVideoDetails. Let’s create that in the next Step.
Step 16: Open up public/js/services/video.client.service.js and add this method like so:
|
1 2 3 4 5 6 7 8 9 10 |
updateVideoDetails: function(id, video, cb){ $http.put('/api/video/' + id, video).then(function(response){ if(response.data.success){ cb(true, response.data); } else{ cb(false, response.data); } }); }, |
Next, let’s the put method for this route in our backend
Step 17: Open up server/routes.js and add this route like so:
|
1 |
app.put('/api/video/:public_id', token.ensureAuthenticated, Video.updateVideoDetails); |
From the code above, it means we have a new method updateVideoDetails in our Video Server Controller. Let’s add that in the next step.
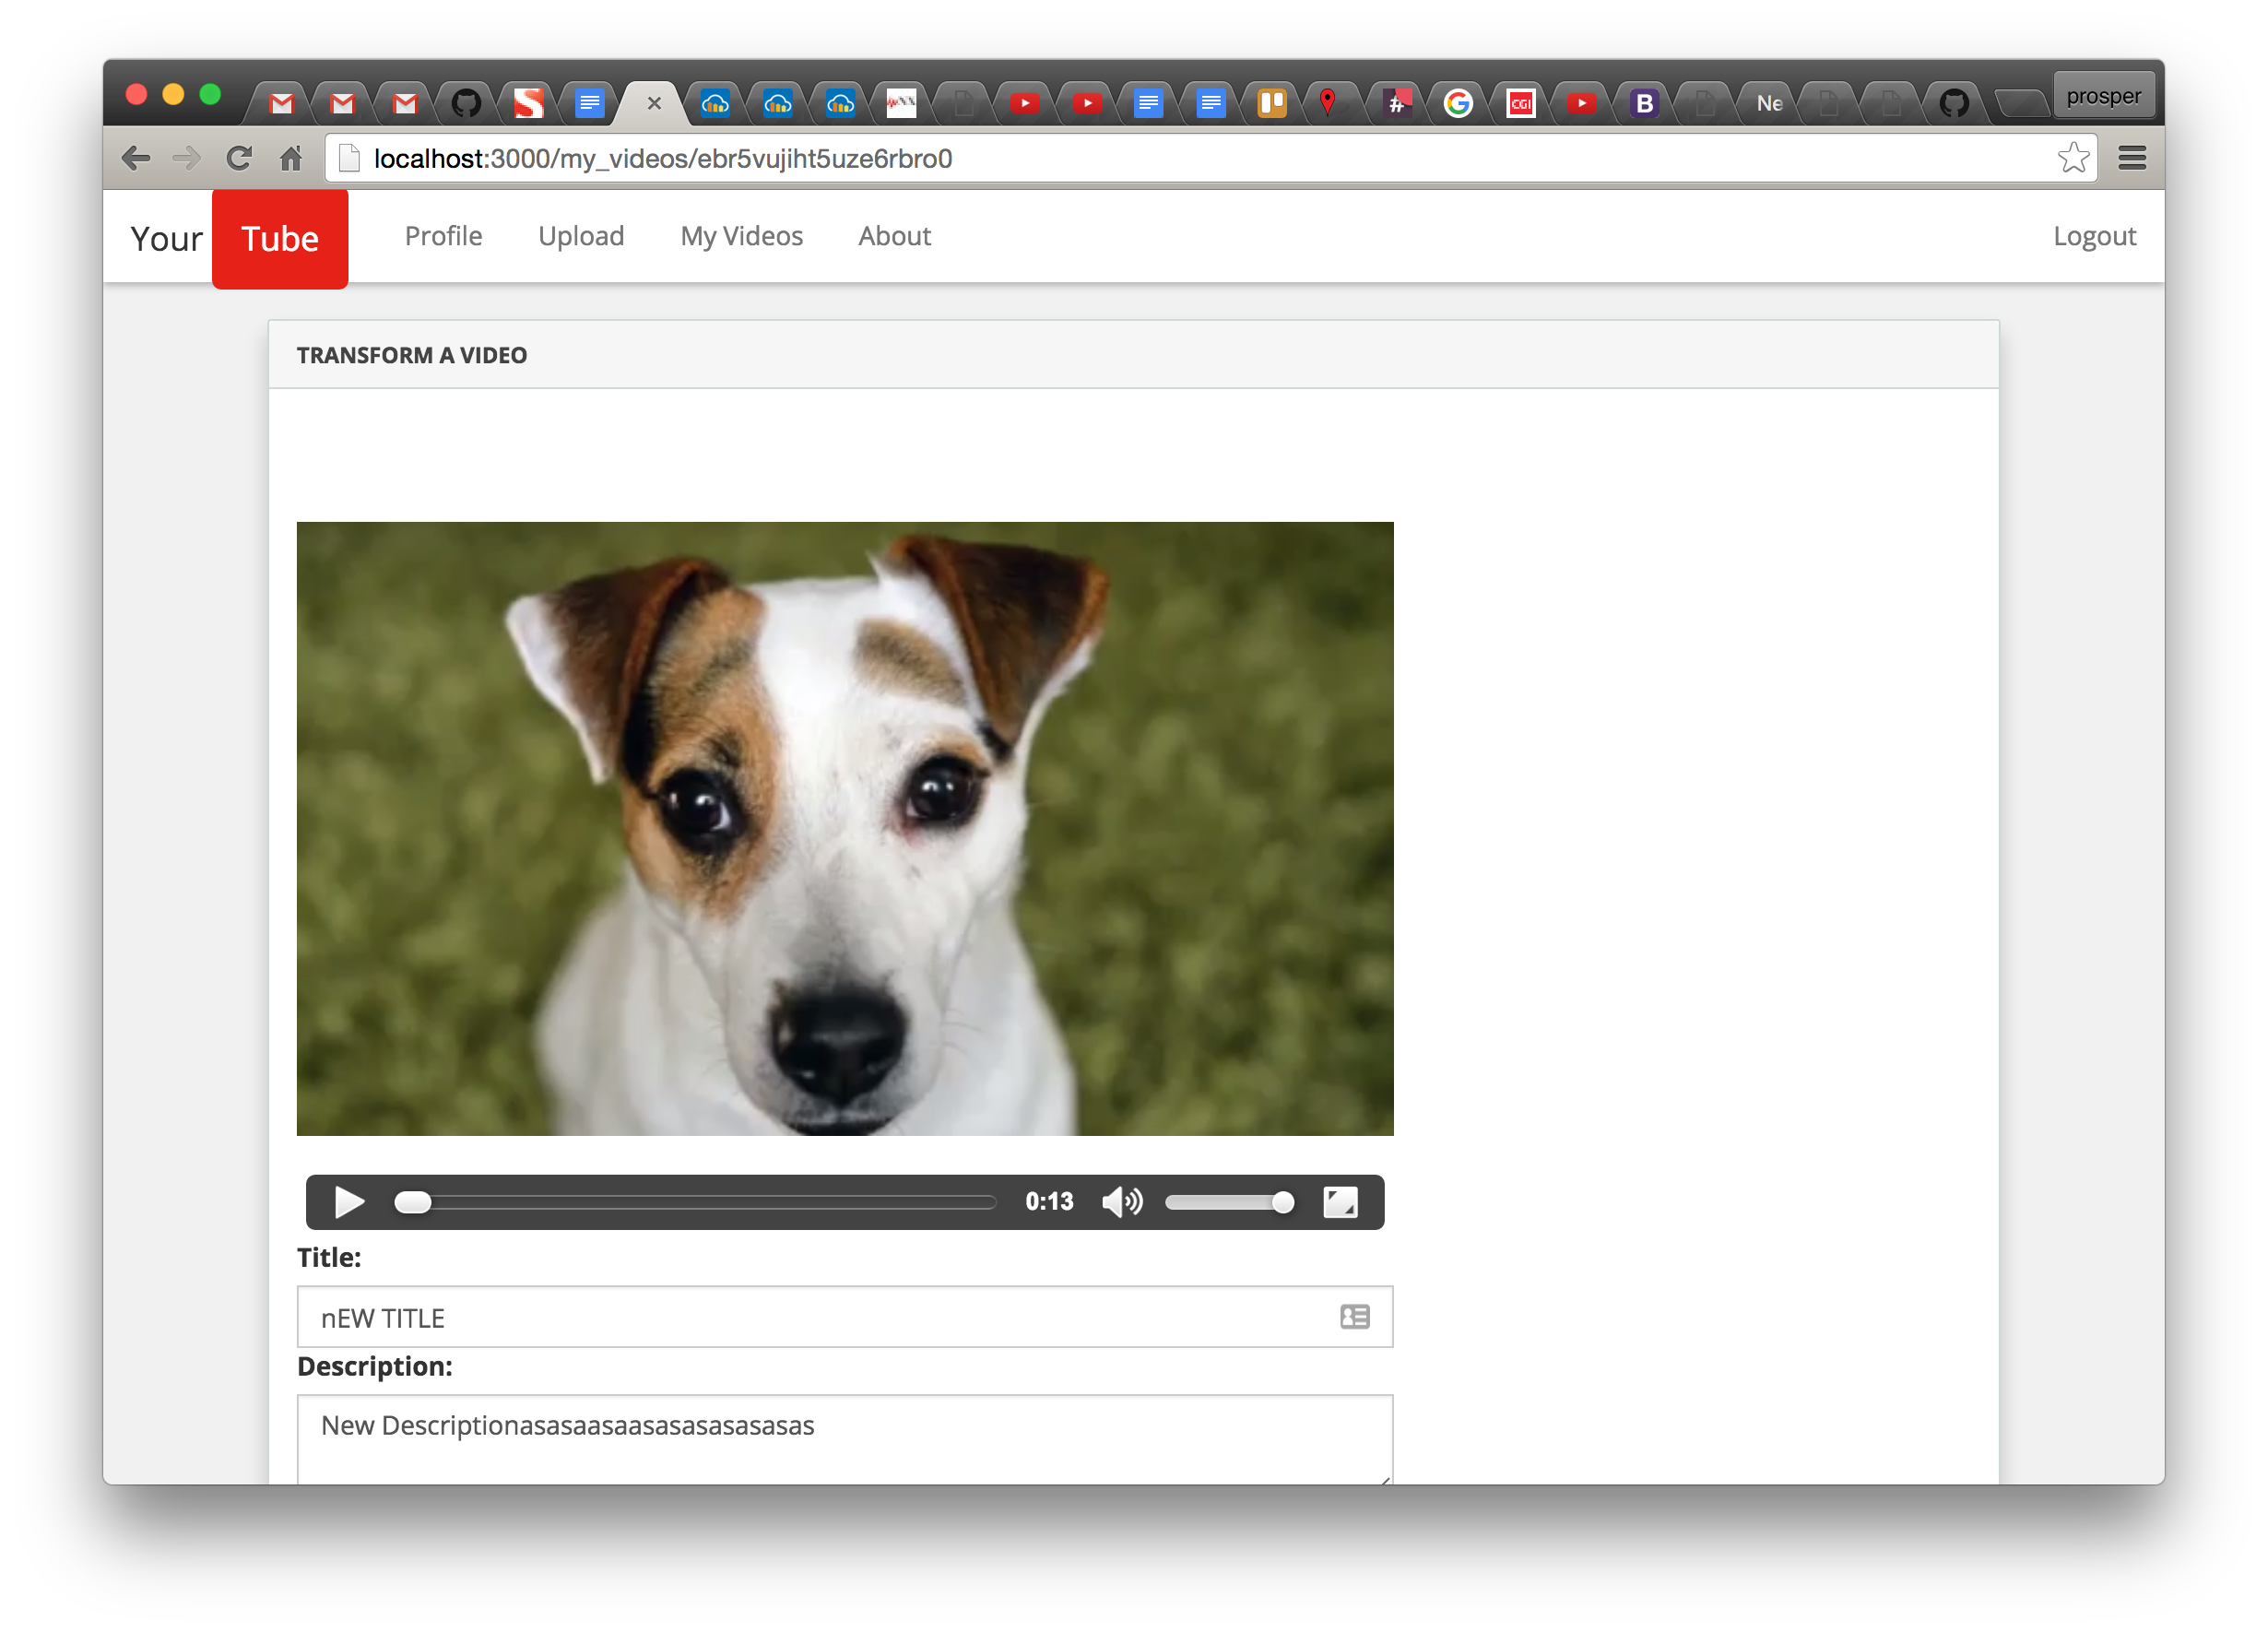
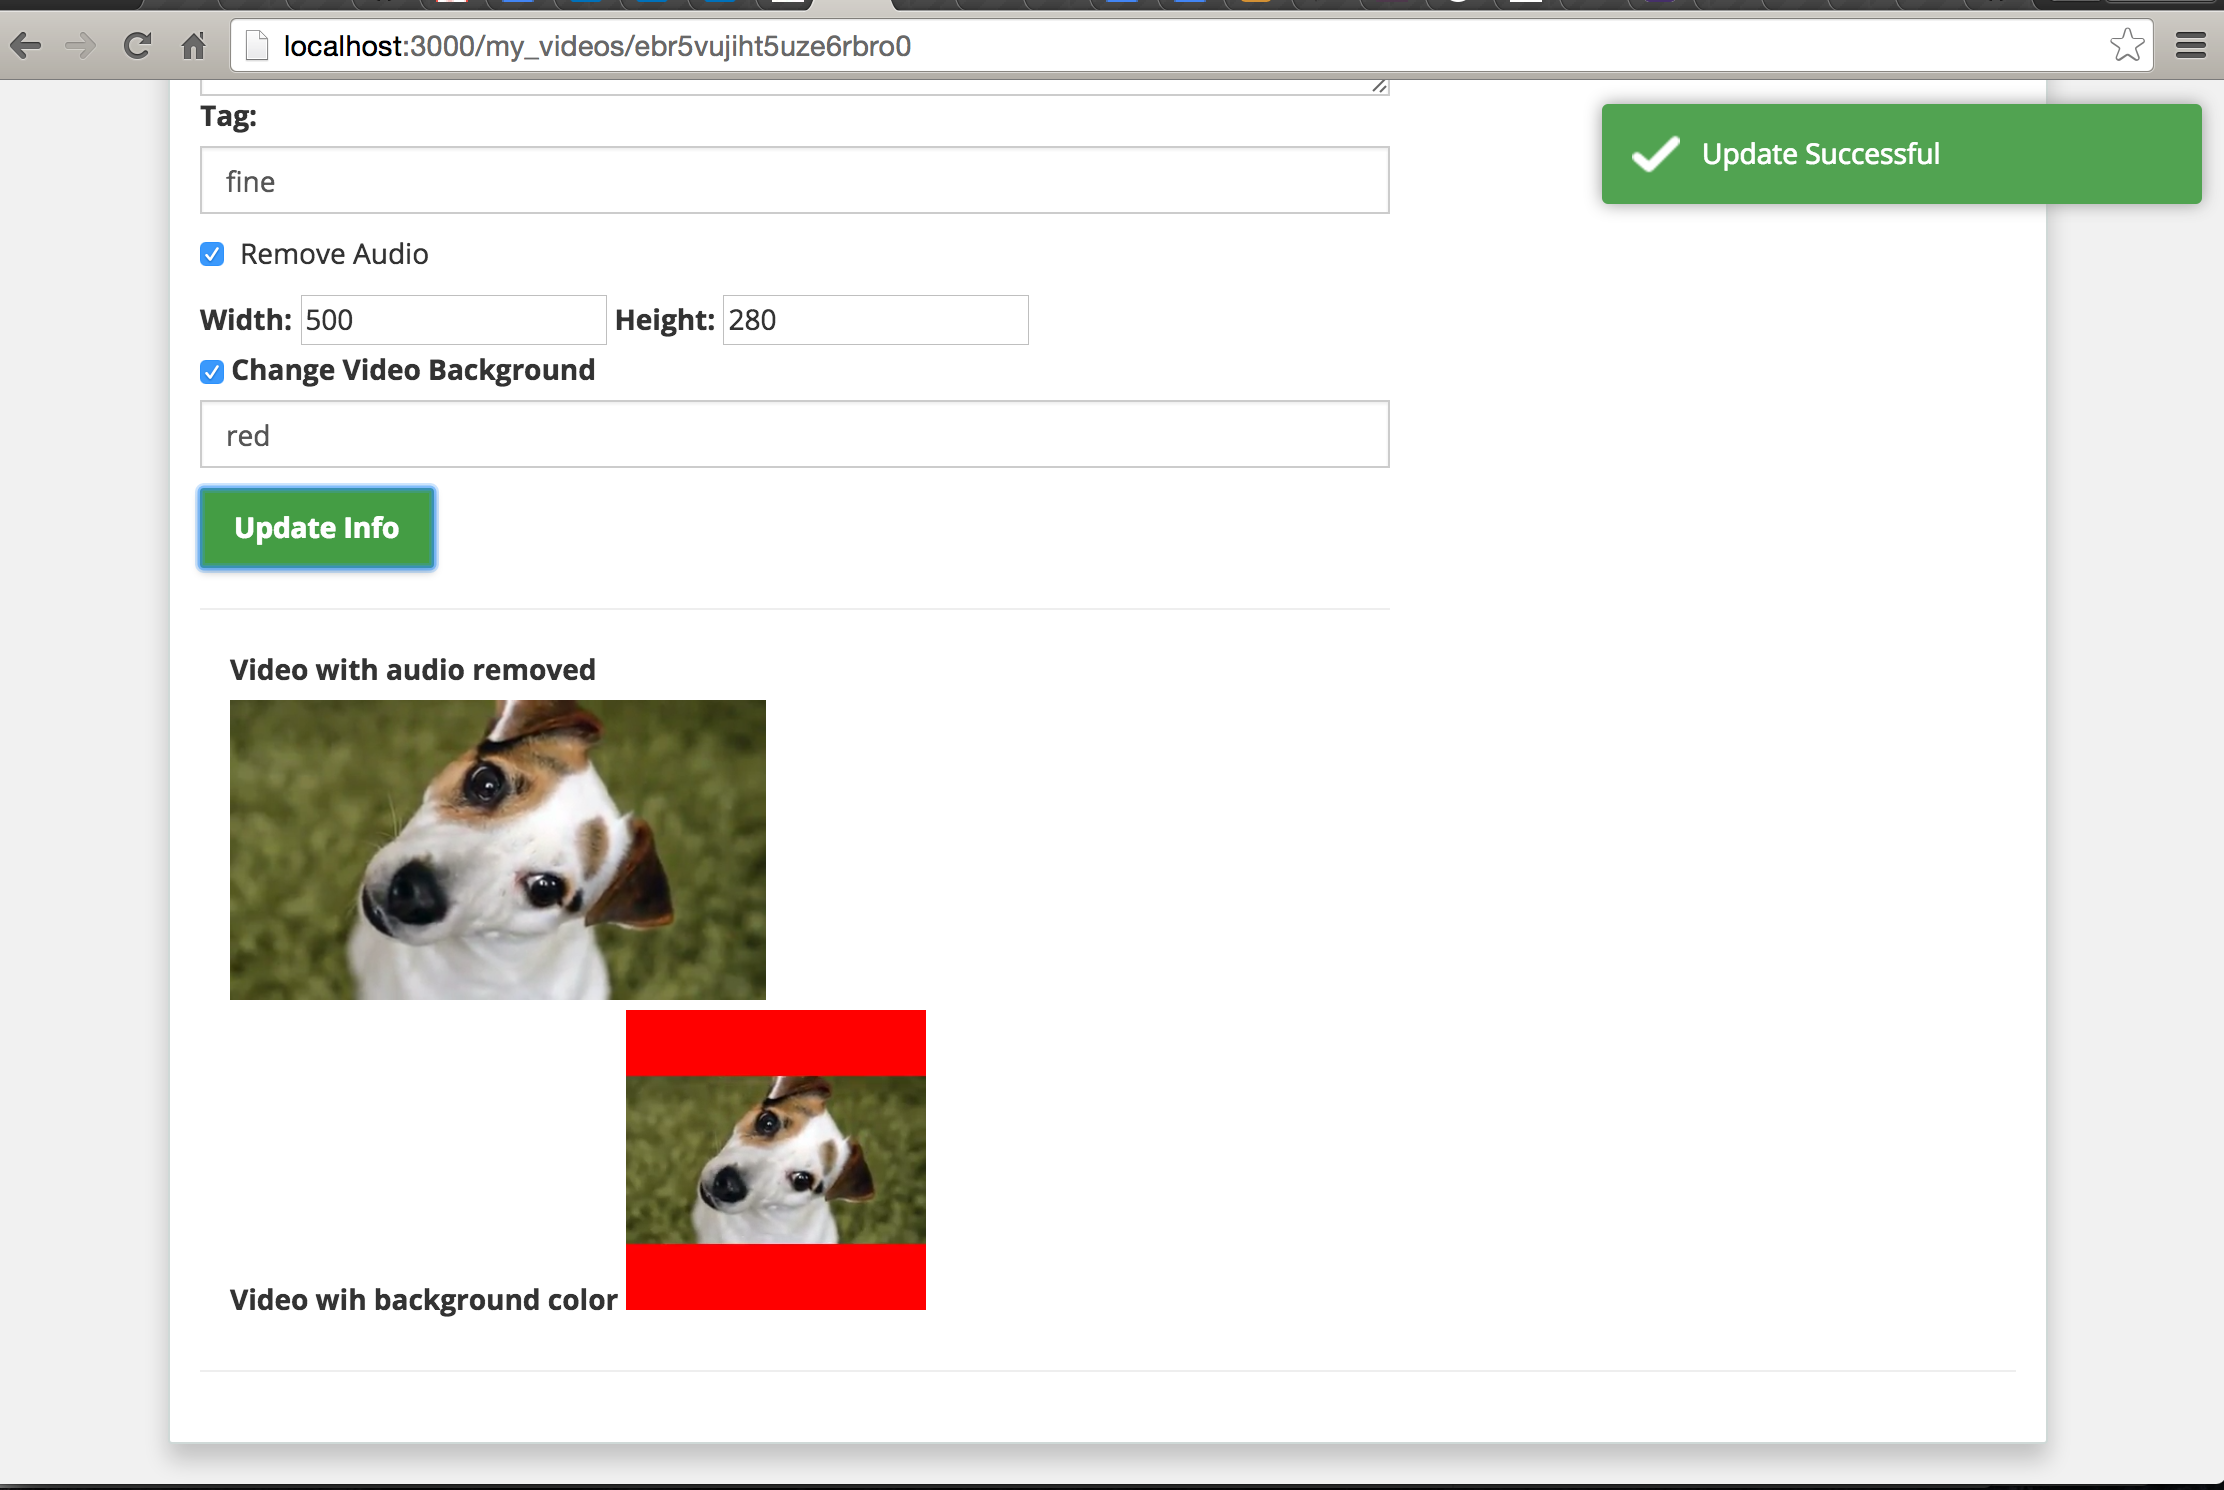
Before we move to the next step, our page should be looking like this now:
Step 18: Open up server/controllers/video.server.controller.js and add this piece of code like so:
|
1 2 3 4 5 6 7 8 9 10 11 12 13 14 15 16 17 18 19 20 21 22 |
updateVideoDetails: function(req, res) { var publicId = req.params.public_id; var videoDetails = req.body; Upload.tagVideos(req, res); if(req.body.audio) { var newVideoUrl = Upload.removeAudio(req, res); } if(req.body.videoBackground) { var coloredVideoUrl = Upload.changeBackground(req, res); } Video.update({public_id : publicId}, videoDetails, function (err) { if(err) { return res.status(404).json({success: false, message: 'User Details Not Found', err: err}); } else { return res.status(200).json({success: true, message: 'Update Successful', audioUrl: newVideoUrl, colorVideoUrl: coloredVideoUrl }); } }); } |
Look at the code above closely, you’ll discover that we have three methods tagVideos, removeAudio and changeBackground from the Upload server controller. Let’s add that in the next step.
Step 19: Open up server/controllers/upload.server.controller.js and add these methods this like so:
|
1 2 3 4 5 6 7 8 9 10 11 12 13 14 15 16 17 18 19 20 21 22 23 24 25 |
tagVideos: function(req, res) { var tag = req.body.tag; var publicId = req.params.public_id; cloudinary.uploader.add_tag( tag, [ publicId ], function(response){ console.log(response); }, { resource_type: "video" }); }, removeAudio: function(req, res) { var videoUrl = req.body.url; var publicId = req.params.public_id; var format = req.body.format; var response = videoUrl.split("upload")[0].concat("upload/ac_none/" + publicId + "." + format ); return response; }, changeBackground: function(req, res) { var videoUrl = req.body.url; var publicId = req.params.public_id; var format = req.body.format; var color = req.body.videoBackground || "yellow"; var response = videoUrl.split("upload")[0].concat("upload/w_300,h_300,c_pad,b_" + color + "/" + publicId + "." + format ); return response; } |
To add tags to the video, all you need is the add_tag cloudinary method, then pass in the tag and the public id of the video you want to tag.
This piece of code below is a typical way of adding tags, where animal is the tag, dog and lion are the public_ids of the video.
|
1 2 3 |
cloudinary.uploader.add_tag('animal', [ 'dog', 'lion' ], function(result) { console.log(result) }, { resource_type: "video" }); |
Those are the tags I have been adding.
Note: I was too lazy to implement a proper tagging system, so you can get your hands dirty by using angular-selectize or even ng-selectize to implement a cool tag feature.
To remove audio from a video, this is the typical way
|
1 2 3 |
cloudinary.uploader.upload("dog.mp4", function(response){ return res.json({ response: response }); }, { resource_type: "video", audio_codec: "none" }); |
where dog.mp4 is the name of the video, and the audio_codec property is set to none. I discovered that the cloudinary API is so easy to use, just ensure you have this upload/ac_none/ in the URL and the audio will be stripped off. So a typical video URL with audio removed will look like so:
http://res.cloudinary.com/demo/video/upload/ac_none/ebr5vujiht5uze6rbro0.mp4
To change a video’s background color, this is the typical way
|
1 |
cloudinary.video("dog.mp4", {width: 250, height: 250, background: "black", crop: "pad"}) |
which actually translates to this :
http://res.cloudinary.com/demo/video/upload/w_250,h_250,c_pad,b_black/dog.mp4
Note: One thing I really love about these transformations is that they are simply API based. Find out more here
Look at our changeBackground method, I ensured this upload/w_300,h_300,c_pad,b_ was included the video url. We passed the color the user chose from the frontend. If the user doesn’t add any background color, it uses yellow by default.
Note: I hard-coded the width and height of the color area like so w_300, h_300. You can also decide to get that from the frontend instead of hard coding it like I did. I also didn’t validate the form fields. I’ll leave that for you to do.
Get your hands dirty!!!
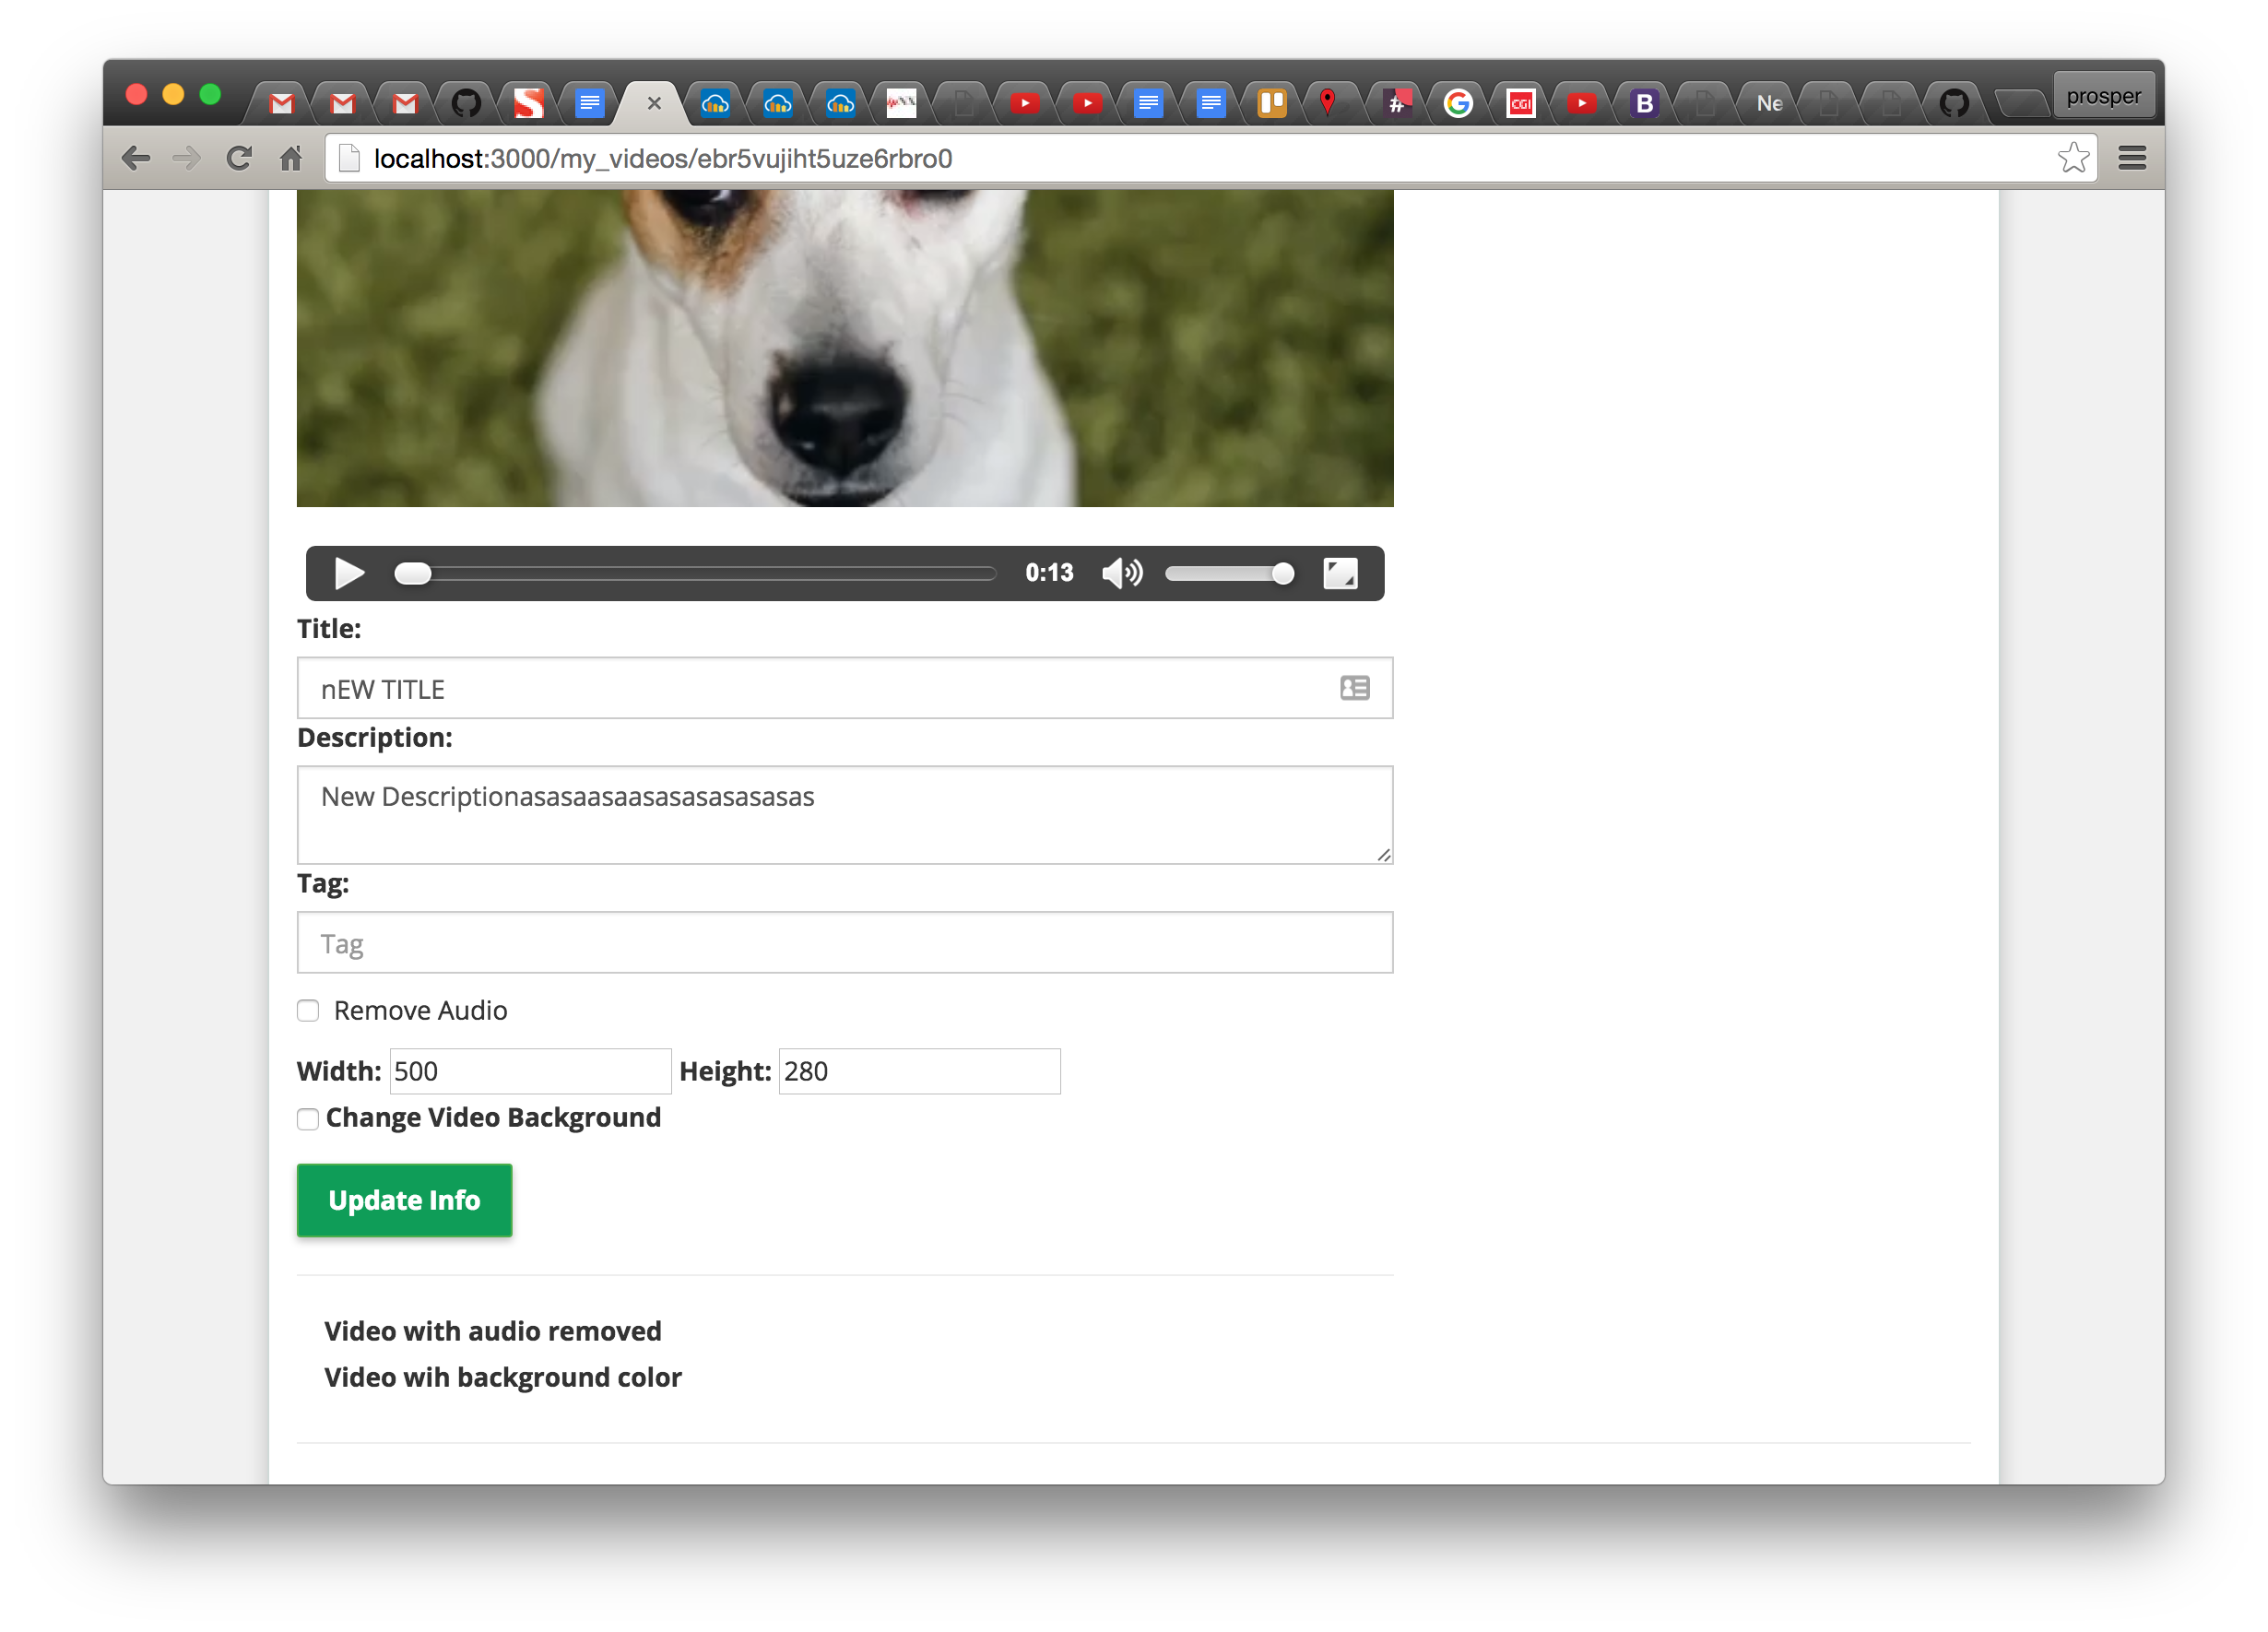
Step 20: Now, try updating a video, check the remove audio box, add a color, and update like so:
Conclusion
In this post, we have looked at chunked video uploading, saving more video details, assigning tags to a video, video transformations like removing audio, displaying video dimensions, changing video background and also delivering the videos. In the next post, we’ll look at video resizing & cropping, renaming, trimming, deleting, concatenating, rotating, and creating rounding corners/circular videos.
The source code for this project is on GitHub.
If you have any questions or observations, please drop your thoughts in the comment section below
- How to build your own Youtube – Part 10 - August 1, 2016
- How to build your own Youtube – Part 9 - July 25, 2016
- How to build your own Youtube – Part 8 - July 23, 2016
- How to build your own Youtube – Part 6 - July 6, 2016
- Introducing Laravel Password v1.0 - July 3, 2016
- How to build your own Youtube – Part 5 - June 28, 2016
- How to build your own Youtube – Part 4 - June 23, 2016
- How to build your own Youtube – Part 3 - June 15, 2016
- How to build your own Youtube – Part 2 - June 8, 2016
- How to build your own Youtube – Part 1 - June 1, 2016